This document provides a hands-on guide to understanding how runtimes interacts with network devices and namespaces, focusing on the new "Network Devices" feature described in the OCI (Open Container Initiative) runtime specification. The feature is expected to be released in the version 1.3.0 of the OCI specification.
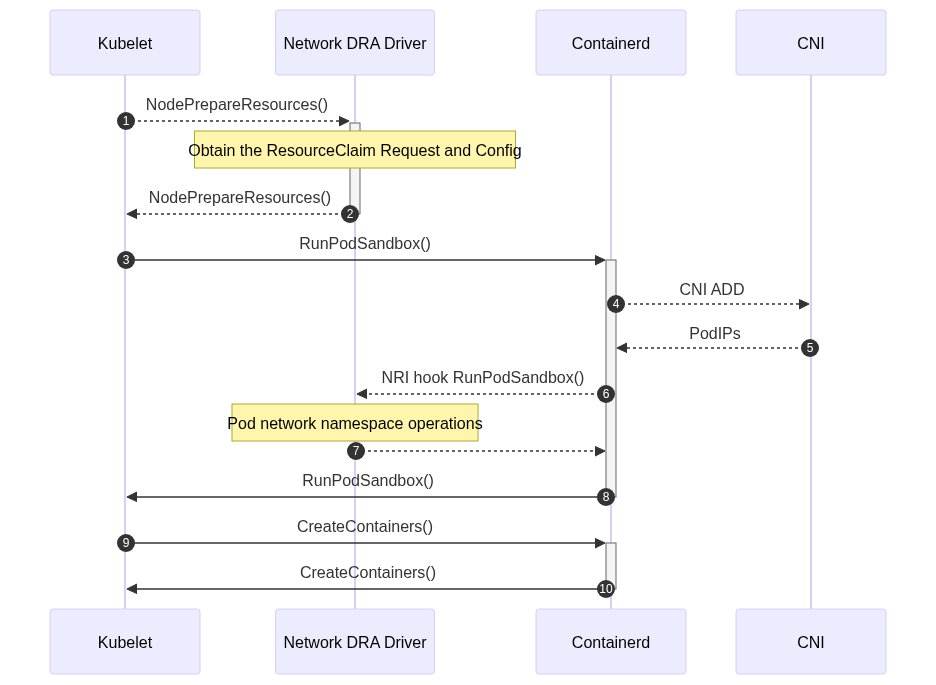
In high-level container orchestration systems like Kubernetes, the management of network namespaces and interfaces is handled by the Container Runtime Interface (CRI) during hooks like RunPodSandbox. The network namespace is prepared by the high level container runtime (containerd, CRIO, ... ) and then passed to the low-level runtime (runc, crun, yuoki, ...).
This illustrates how we can prepare network resources on the host and then pass them to a low-level runtime like runc. The "Network Devices" feature allows specific network interfaces from the host system to be moved into a container's network namespace.
Before starting, ensure you have the following installed on your Linux system:
- runc: build with the new OCI feature. There are other runtimes like crun or youki that implements this feature and can be used too.
- docker: Used here simply to export a busybox root filesystem but you can
use also
podman. - jq: used for modifying config.json.
- iproute2: For network namespace and interface manipulation (ip link, ip netns).
First, create the necessary directory structure and a basic config.json for your
container. We will use busybox as a lightweight root filesystem.
# Create the container bundle directory
mkdir /mycontainer
cd /mycontainer

# Create the rootfs directory
mkdir rootfs

# Export busybox via Docker into the rootfs directory
docker export $(docker create busybox) | tar -C rootfs -xvf -

# Generate a default OCI spec (config.json)
runc specAn administrator or a third-party application is responsible for managing network devices on the host. In this step, we'll create a simple virtual network interface, a "dummy" device, which we will later move into the container.
# Create a dummy network interface named dummy0 on the host
sudo ip link add dummy0 type dummy

# Bring the dummy0 interface up
sudo ip link set dummy0 up

# Verify the dummy0 device on the host
ip link show dummy0
You should see output similar to this, confirming dummy0 exists and is up:
247: dummy0: <BROADCAST,NOARP,UP,LOWER_UP> mtu 1500 qdisc noqueue state UNKNOWN mode DEFAULT group default qlen 1000
link/ether da:fc:92:48:6d:17 brd ff:ff:ff:ff:ff:ffIn Kubernetes, a higher-level runtime (containerd, CRIO) creates and manages these namespaces and then passes them to runc.
# Create a new network namespace named mynetns on the host
sudo ip netns add mynetns

# Verify the new network namespace exists
ip netns show
You should see mynetns listed in the output.
Now we will modify the config.json to tell runc to use mynetns and to move our
dummy0 interface into it, renaming it to ctr_dummy0 inside the container.
We'll use jq for these modifications.
First, update the namespaces section to point to the external mynetns:
jq '.linux.namespaces |= (map(select(.type != "network")) + [{"type": "network", "path": "/var/run/netns/mynetns"}])' config.json > config-netns.jsonNext, configure the netDevices section to specify which host device to move and what its new name should be inside the container.
jq '.linux.netDevices |= {"dummy0": { "name" : "ctr_dummy0" } }' config-netns.json > config.jsonHere, "dummy0" is the name of the interface on the host, and "name": "ctr_dummy0" specifies its name inside the container. This command also
overwrite the original config.json that will be used by runc to create the
container.
There are existing technologies that allow to perform these operations on the OCI spec, like CDI or NRI that are well supported in Kubernetes, per example using device plugins or DRA
Now, execute the container using the modified config.json. We'll run it with a shell so you can inspect its network configuration.
IMPORTANT The runc used to create the container must have support for
the new feature.
# Execute the container using the modified spec
# This runc has to be built with the new feature.
sudo runc run testid
If successful, you will get a shell prompt inside the container.
Once inside the container, you can use ip a to see the network interfaces.
# Inside the container shell, run:
/ # ip a
You should observe that the dummy0 interface from the host has been moved into the container and renamed to ctr_dummy0:

1: lo: <LOOPBACK> mtu 65536 qdisc noop qlen 1000
    link/loopback 00:00:00:00:00:00 brd 00:00:00:00:00:00
248: ctr_dummy0: <BROADCAST,NOARP,UP,LOWER_UP> mtu 1500 qdisc noqueue qlen 1000
    link/ether da:fc:92:48:6d:17 brd ff:ff:ff:ff:ff:ff
    inet6 fe80::d8fc:92ff:fe48:6d17/64 scope link
       valid_lft forever preferred_lft forever
The original dummy0 interface on the host should no longer be present in the
root namespace. You can verify its presence within mynetns from the host:
# From your host machine (outside the container shell), run:
sudo ip netns exec mynetns ip a
This command executes ip a specifically within the mynetns namespace. You should see dummy0 listed there, with its new name:
1: lo: <LOOPBACK> mtu 65536 qdisc noop state DOWN group default qlen 1000
    link/loopback 00:00:00:00:00:00 brd 00:00:00:00:00:00
247: ctr_dummy0: <BROADCAST,NOARP,UP,LOWER_UP> mtu 1500 qdisc noqueue state UNKNOWN group default qlen 1000
    link/ether da:fc:92:48:6d:17 brd ff:ff:ff:ff:ff:ff
    inet6 fe80::d8fc:92ff:fe48:6d17/64 scope link proto kernel_ll
valid_lft forever preferred_lft foreverWhen the container exits, the network namespace (mynetns) will still exist and
hold the dummy0 interface, now renamed to ctr_dummy0. This is by design, as
high-level runtimes are responsible for the lifecycle of the network namespace.
They may choose to keep it active for other containers or clean it up.
You can manually delete the network namespace once you are done:
# From your host machine, delete the network namespace
sudo ip netns del mynetns
Deleting the network namespace (mynetns) will automatically delete the dummy0
because it is a virtual interface, physical interfaces will returned back to
the host's root network namespace, more details about this on Navigating Linux
Network Namespaces and
Interfaces