You signed in with another tab or window. Reload to refresh your session.You signed out in another tab or window. Reload to refresh your session.You switched accounts on another tab or window. Reload to refresh your session.Dismiss alert
The hue system is built around the idea of everything in your system having a unique URL served by the bridge. Interacting with these URLs lets you modify them or find out their current state.
Hue Web Addresses
A hue resource web address for the V2 API will typically start with the following.
Plain text
Copy to clipboard
Open code in new window
EnlighterJS 3 Syntax Highlighter
https:///clip/v2
https:///clip/v2
https:///clip/v2
This is the RESTful root and is how your app or controller talks to the Hue Bridge interface.
Hue Application Key
In most of the commands (the exceptions are creating a key and getting basic bridge information) you’ll include a hue-application-key in the header:
Plain text
Copy to clipboard
Open code in new window
EnlighterJS 3 Syntax Highlighter
GET /clip/v2 HTTP/2
Host: <bridge IP address>:443
hue-application-key: <appkey>
GET /clip/v2 HTTP/2 Host: :443 hue-application-key:
GET /clip/v2 HTTP/2
Host: :443
hue-application-key:
This application key determines which resources you have access to. If you provide an application key that isn’t known to the bridge then most resources won’t be available to you. Using one that is authorized, as shown in the getting started section, will allow you to interact with pretty much everything interesting.
Each new instance of an app should use a unique application key which you generate using the Create New User command.
Resources
There are many different kinds of resources to interact with. The top 3 most used ones are:
/resource/device resource which contains all devices connected to the bridge (and the bridge itself) /resource/light resource which contains all light services /resource/room resource which contains all rooms
The list of all resources is available in the API reference.
You can query resources available in your bridge by doing a GET on its local URL. For example the following returns all devices in your bridge.
Address
https://<bridge IP address>/clip/v2/resource/device
Method
GET
Header
hue-application-key: <appkey>
Change a Resource
The principle for changing a resource is to send a PUT request to the URL of that specific resource. The desired new value is attached to the request in the Message Body in JSON format.
For example to change the name of a device we address the device resource by its id (/resource/device/<id>) and send the new name with the request in the message body.
Address
https://<bridge IP address>/clip/v2/device/<id>
Method
PUT
Header
hue-application-key: <appkey>
Body
{"metadata": {"name": "developer lamp"}}
If you’re doing something that isn’t allowed, maybe setting a value out of range or typo in the resource name, then you’ll get a 4xx HTTP status code and an error message letting you know what’s wrong.
Service references
Each device in the Hue System typically offers a set of services. For example a light service, a connectivity service, or a motion sensing services. Each of these services have their own resource which will be referenced via the resource type rtype and resource id rid. This way you can link to those services to read or modify their state. For example, to address the light service of the example device below, the path would be /resource/light/c6b028c8-076e-4817-92b1-bcb0cbb78783
There are multiple light features that can be controlled with Hue. These features are in sub-objects of the light service. Let’s go through them and explain.
The Easy Ones
on – This is the easiest example. A light can be on or off. So setting this value to true turns a light on to its last setting {"on": {"on": true}}. Setting the value to false turns the light off.
dimming – This is about controlling brightness of a light. We use the brightness in % (note minimum brightness is not off). The range has been calibrated so there are perceptually similar steps in brightness over the range. You can set the “brightness” key in the “dimming” object to a specific value, e.g. the following command sets the light to 50% of its maximum brightness.
Address
https://<bridge IP address>/clip/v2/resource/light/<id>
Method
PUT
Header
hue-application-key: <appkey>
Body
{"dimming": {"brightness": 50}}
Colors Get More Complicated
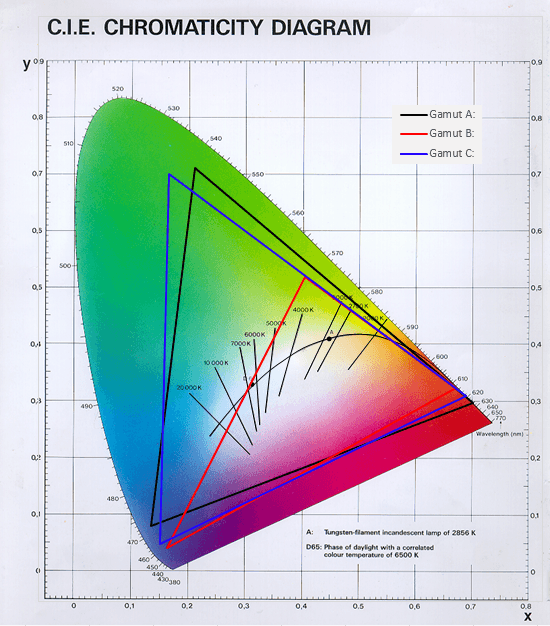
The color point of light has lots of ways of being quantified. The diagram below shows a plot of what is known as the CIE color space – the 3 triangles outline the colors which Hue can address.
All points on this plot have unique xy coordinates that can be used when setting the color of a Hue bulb. If an xy value outside of bulbs relevant Gamut triangle is chosen, it will produce the closest color it can make. To control lights with xy use the “xy” sub-object within the “color” object which takes an x and y values between 0 and 1 e.g. {"color": {"xy": {"x":0.675, "y":0.322}}} is red.
We can also choose to address the color point of light in a different way, using colors on the black curved line in the center of the diagram. This is the line that follows white colors from a warm white to a cold white. Hue supports color temperatures from 2000K (warm) to 6500K (cold) with high quality white light. To set the light to a white value you need to interact with the “color_temperature” object, which takes values in a scale called “reciprocal megakelvin” or “mirek”. Using this scale, the warmest color 2000K is 500 mirek {"color_temperature": {"mirek": 500}} and the coldest color 6500K is 153 mirek. As with xy, the light will go to the closest value it can produce if the specified color temperature is outside of the achievable range.
An important note is that availability of the feature objects depends on device capabilities. So for example a light that has no color capabilities, will not have the color feature object.
Representations
The Hue system is built on the principle of representations. Each object in the Hue system has a corresponding resource in the Hue interface (a representation of the real object). You interact directly with these representations and afterwards the necessary Zigbee commands are sent out to lights to effect the change.
This lets us do things fast without worrying about the wireless messages bouncing between the lights, but it can mean that things are temporarily inconsistent. By this we mean the state of the lights and the state of their representation are not the same for a short period. It corrects itself after a while, but for example if you set all your lights to red and then power cycle a light so that it goes to white, it could take a few minutes for the bridge to update its representation.
Rooms
A user can have a lot of devices in their home. To organize them, we typically list devices per room, as each device can only be part of one room. By now it will probably be clear that retrieving the list of rooms can be done by a GET on /resource/room. This shows the id and name of each room, with the array of “children” referring to the devices in the room. Referencing the devices uses the same universal method as we’ve seen before with services i.e. using “rid” and “rtype”. As you can see in the example below the room itself also offers a “grouped_light” service. This can be used to control the lights as a group, in a similar way as controlling an individual light.
With these commands you can control any number of your lights in any way you want, just address the correct light resource and send it the command you want.
We have some limitations to bear in mind:
We can’t send commands to the lights too fast. If you stick to around 10 commands per second to the /light resource as maximum you should be fine. For /grouped_light commands you should keep to a maximum of 1 per second. The REST API should not be used to send a continuous stream of fast light updates for an extended period of time, for that use case you should use the dedicated Hue Entertainment Streaming API.
If you try and control multiple conflicting parameters at once e.g. {"color": {"xy": {"x":0.5,"y":0.5}}, "color_temperature": {"mirek": 250}} the lights can only physically do one, for this we apply the rule that xy beats ct. Simple.
All your lights have to be in range of the bridge. If you can control them from the Hue app then you’re fine to play with them via the API. Remember all lights act as a signal repeater so if you want more range put a light in between.
Events
As we have seen, you need to use a GET request to retrieve the state of resources when you first connect to the Hue Bridge. However, while you are connected, other applications and control methods can modify the state of those resources as well. It is important to not try to stay up to date by performing repeated GET requests, as that is bad for the performance of the system and generally gives a laggy user experience. Instead, you can subscribe to retrieving proactive event notifications immediately when something changes. This can be done by leveraging ‘Server-Sent Events’ (SSE) under the /eventstream endpoint:
Events have an id, timestamp, type (‘update’, ‘add’, ‘delete’, ‘error’), and data field which contains the changed properties of the resource in the same format as a GET response on the same resource type, but with all properties optional as each event only includes the properties that changed. The following is an example event stream that would result from turning a light on and off:
On HTTP1.1, you will need a separate connection for the SSE request and regular requests, but we recommend using HTTP2 to multiplex them over a single connection which is more resource efficient.
There is a 1 second rate limit on the amount of event containers the Bridge will send. If the same property has changed twice within that timeframe, you only get the last state. If multiple resources have changed within that timeframe, then you will get multiple events grouped in a single container.
More
There’s a lot more to the Hue System, for example:
Zones are a way of grouping just like rooms, but they group services rather than devices, and have no restrictions i.e. services can be part of multiple zones
Scenes are a way of creating preset light settings for all lights within a room or zone, which can then be easily recalled later
Sensor services like “motion”, “light_level” and “temperature” can indicate information about the environment
Button service can be used to receive an event when a user presses a button on one of our button/switch devices
Entertainment configurations enable fast changing position based light effects for Hue Entertainment use cases
Behaviors are used to create and configure automations in the Hue System, however this is under development and at this moment you can only list behaviors
They all follow many of the same core concepts you have just learned about, so have fun exploring our full API Reference!
The fastest way to learn how to build apps which control the hue system is to use a simple API testing tool. This lets you directly input commands and send them to the lights. In this article we'll use Postman, but any HTTP client should work.
Follow 3 Easy Steps
Step 1
First make sure your bridge is connected to your network and is functioning properly. Test that the official Philips Hue mobile app can control the lights on the same network.
Step 2
Then you need to discover the IP address of the bridge on your network. You can do this in a few ways.
NOTE – When you are ready to make a production app, you need to discover the bridge automatically using Hue Bridge Discovery Guide.
1. Go to the settings menu in the app. Go to Hue Bridges. Select your bridge. The ip address of the bridge will show.
2. Use an mDNS discovery app to find Philips hue in your network.
3. Use our broker server discover process by visiting https://discovery.meethue.com
4. Log into your wireless router and look Philips hue up in the DHCP table.
Step 3
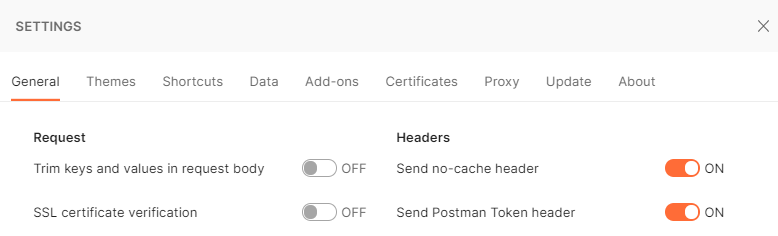
Download, install, and open the Postman tool (or any other API testing tool to your liking) and disable ‘SSL certificate verification’ in File – Settings menu.
NOTE – When you are ready to make a production app, you need to properly validate the certificate, see Using HTTPS.
Using an API testing tool you can populate the components of an HTTPS request – the basis of all web traffic and of the hue API.
1. URL: this is actually the local address of a specific resource (thing) inside the hue system. It could be device, light, room, scene or many more things. This is the object you’ll be interacting with in this command.
2. Request method: here you have a choice of the 4 HTTPS methods the hue system uses. GET: this is the command to fetch all information about the addressed resource PUT: this is the command to modify an addressed resource POST: this is the command to create a new resource inside the addressed resource DELETE: this is the command to delete the addressed resource
3. Request body: this is the part of the message which describes what you want to change and how. Here you enter, in JSON format, the resource name and value you’d like to change/add.
4. Response code: This will indicate whether your request succeeded or failed.
5. Response body: Here you’ll see the response to your command. Also in JSON format.
So let’s get started…
First let’s do a very simple request and get information about the devices in your hue system.
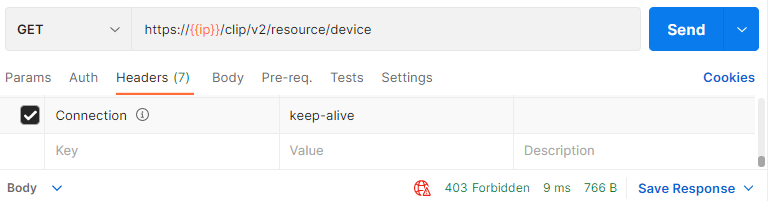
Fill in the details below leaving the body empty and press the Send button.
URL
https://<bridge ip address>/clip/v2/resource/device
Method
GET
Make sure you are on the same network as the bridge, and that you use the ip you obtained in step 2. Now you should see the response code 403 Forbidden:
That’s because we did not yet provide a hue-application-key header for authorization.
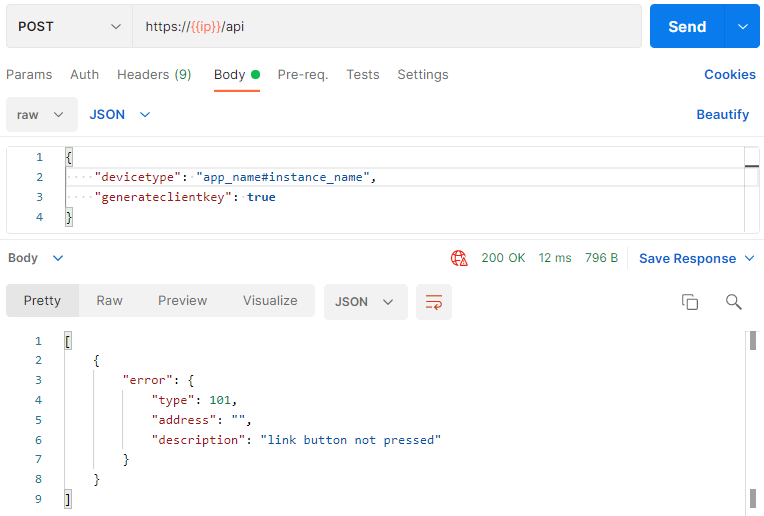
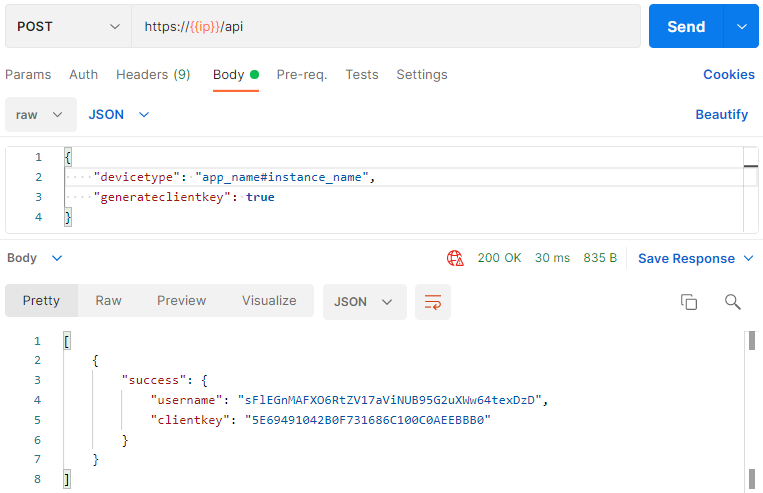
We need to use the randomly generated application key that the bridge creates for you. Fill in the info below and press the Send button.
You should get back an error message letting you know that you have to press the link button.
This is our security step so that only apps you want to control your lights can. By pressing the button we prove that the user has physical access to the bridge.
Go and press the button on the bridge and then press the Send button again and you should get a success response like below.
You’ve now created an authorized username, which we’ll use as the hue-application-key from now on.
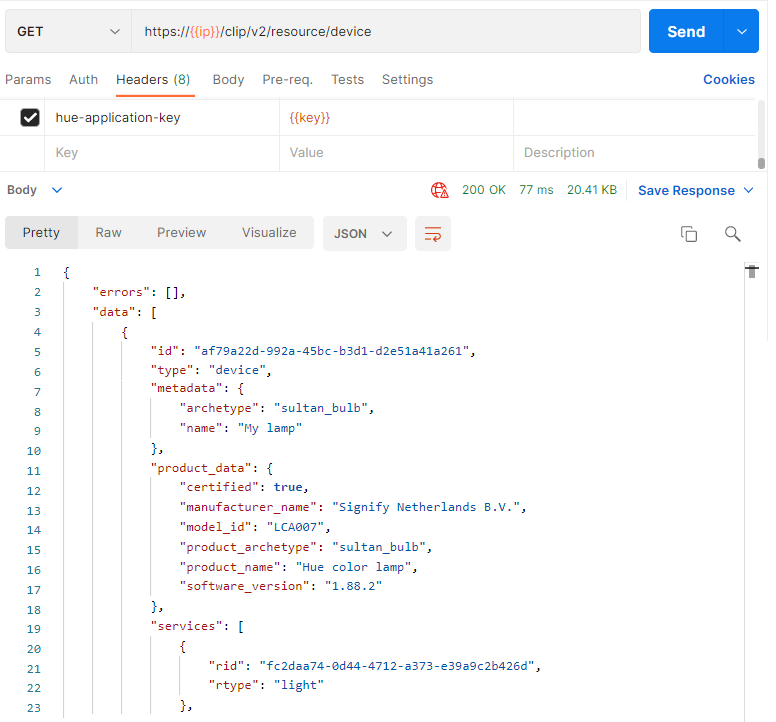
Retrieving device list
In the Headers section you should add a header with name hue-application-key and value the username (sFlEGnMAFXO6RtZV17aViNUB95G2uXWw64texDzD in above example). From here on we will refer to this username as appkey. Now if you do the first GET request again you should get a 200 OK response code with a whole lot of information about what devices you have and what services they offer in the response body. This data is all in JSON format so can be easily processed by your applications.
Address
https://<bridge ip address>/clip/v2/resource/device
Method
GET
Header
hue-application-key: <appkey>
Congratulations you’ve just sent you first authorized CLIP command!
Controlling a light
Okay now that we have a hue-application-key with permission to use the system lets start having some fun.
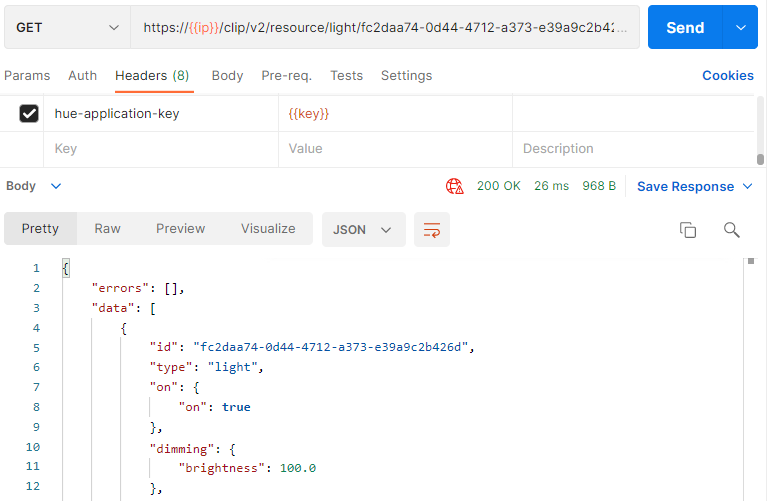
You should see that most Hue devices offer a light service. Each light service has its own URL, which you can construct using the “rtype” and “rid” of the service. Let’s get information about the light service with rid fc2daa74-0d44-4712-a373-e39a9c2b426d by filling that in the id part of the address below. In your case you need to take the rid of the light service reported by your device.
Address
https://<bridge ip address>/clip/v2/resource/light/<id>
Method
GET
Header
hue-application-key: <appkey>
In this response you can see all of the properties this light service has. The most interesting ones are the feature objects on, dimming, color_temperature, and color. These are the ones we’ll use to control the light.
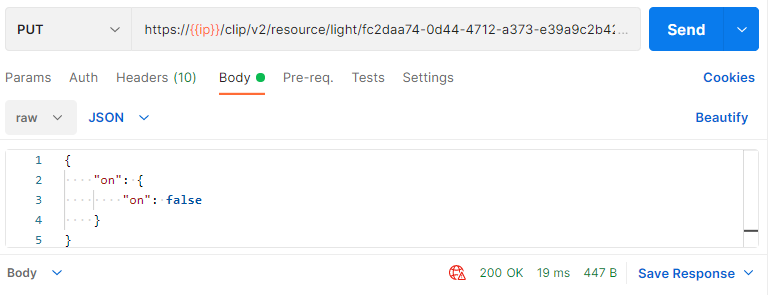
Let’s start with the “on” object. This is a very simple object with an on attribute that can have 2 values: true and false. So let’s try turning the light off.
Address
https://<bridge ip address>/clip/v2/resource/light/<id>
Method
PUT
Header
hue-application-key: <appkey>
Body
{"on":{"on":false}}
Looking at the command you are sending we’re addressing the “on” object of the light service and telling it to modify the “on” value inside it to false (i.e. off). When you press the Send button the light should turn off.
Change the value in the body to true and after pressing Send the light will turn on again.
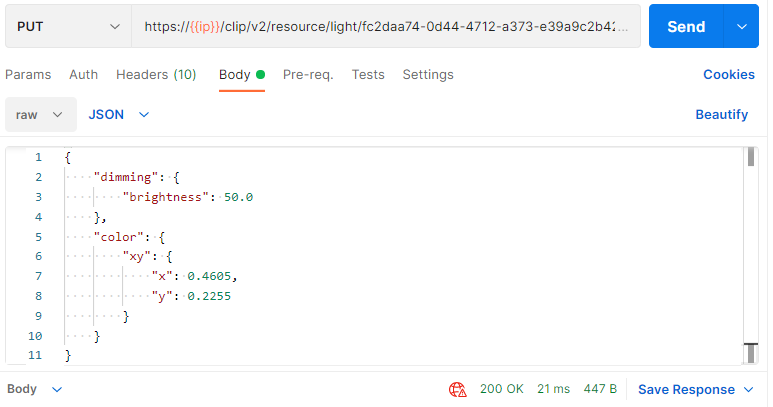
Now let’s do something a bit more fun and start changing some colors. Enter the command below.
Address
https://<bridge ip address>/clip/v2/resource/light/<id>
Now we’re modifying a couple more attributes to set the brightness to 50% and the color to purple at the same time.
The x and y values for color vary between 0 and 1. Try changing the values and keep pressing the Send button and see the color of your light changing. You can use this image to see what values correspond to which colors.
There is also an eventing mechanism to automatically receive changes to resources but more on this later.
Now you understand the basics of the commands you can send to hue through an API testing tool – but we can also send the commands as part of an app. Intrigued now? Read more at Core Concepts.
This document describes the conversion between RGB and xy. It is important to differentiate between the various light types, because they do not all support the same color gamut. For example, the hue bulbs are very good at showing nice whites, while the LivingColors are generally a bit better at colors, like green and cyan. For more info, check out the supported lights page.
Gamut
The colors of Hue lights are controlled by xy values in the CIE color space. Since this is a well defined color space that is independent of the gamut of any specific light, we know for sure that the same xy value always result in the same color, regardless of the type of light used (as long as the color is within the gamut of the light).
Current Philips Hue lights have a color gamut defined by 3 points, making it a triangle. The 3 triangles outline the colors which Hue can address.
For all newer model Hue lights (Gamut C) the corners of the triangle are
For legacy LivingColors Bloom, Aura, Light Strips and Iris (Gamut A) the triangle corners are: Red: 0.704, 0.296 Green: 0.2151, 0.7106 Blue: 0.138, 0.08
If you have light which is not one of those, you should use: Red: 1.0, 0 Green: 0.0, 1.0 Blue: 0.0, 0.0
The Hue API V2 exposes these gamuts on the API for each light resource, so you don’t need to hardcode them. If you have a color defined in RGB that you want to set the Hue lights to, then you need to convert it to xy. The next section outlines how to do that.
RGB to xy
We start with the color to xy conversion, which we will do in a couple of steps:
1. Get the RGB values from your color object and convert them to be between 0 and 1. So the RGB color (255, 0, 100) becomes (1.0, 0.0, 0.39)
2. Apply a gamma correction to the RGB values, which makes the color more vivid and more the like the color displayed on the screen of your device.
This gamma correction is also applied to the screen of your computer or phone, thus we need this to create a similar color on the light as on screen. This is done by the following formulas:
3. Convert the RGB values to XYZ using the Wide RGB D65 conversion formula The formulas used:
Plain text
Copy to clipboard
Open code in new window
EnlighterJS 3 Syntax Highlighter
float X = red * 0.4124 + green * 0.3576 + blue * 0.1805;
float Y = red * 0.2126 + green * 0.7152 + blue * 0.0722;
float Z = red * 0.0193 + green * 0.1192 + blue * 0.9505;
float X = red * 0.4124 + green * 0.3576 + blue * 0.1805; float Y = red * 0.2126 + green * 0.7152 + blue * 0.0722; float Z = red * 0.0193 + green * 0.1192 + blue * 0.9505;
float X = red * 0.4124 + green * 0.3576 + blue * 0.1805;
float Y = red * 0.2126 + green * 0.7152 + blue * 0.0722;
float Z = red * 0.0193 + green * 0.1192 + blue * 0.9505;
4. Calculate the xy values from the XYZ values
Plain text
Copy to clipboard
Open code in new window
EnlighterJS 3 Syntax Highlighter
float x = X / (X + Y + Z);
float y = Y / (X + Y + Z);
float brightness = Y;
float x = X / (X + Y + Z); float y = Y / (X + Y + Z); float brightness = Y;
float x = X / (X + Y + Z);
float y = Y / (X + Y + Z);
float brightness = Y;
5. Check if the found xy value is within the color gamut of the light, if not continue with step 6, otherwise step 7 When we send a value which the light is not capable of, the resulting color might not be optimal. Therefore we try to only send values which are inside the color gamut of the selected light.
6. Calculate the closest point on the color gamut triangle and use that as xy value The closest value is calculated by making a perpendicular line to one of the lines the triangle consists of and when it is then still not inside the triangle, we choose the closest corner point of the triangle.
7. Use the Y value of XYZ as brightness The Y value indicates the brightness of the converted color.
xy to RGB
The xy to color conversion is almost the same, but in reverse order.
1. Check if the xy value is within the color gamut of the lamp, if not continue with step 2, otherwise step 3 We do this to calculate the most accurate color the given light can actually do.
2. Calculate the closest point on the color gamut triangle and use that as xy value See step 6 of color to xy.
3. Calculate XYZ values Convert using the following formulas:
Plain text
Copy to clipboard
Open code in new window
EnlighterJS 3 Syntax Highlighter
float x = x; // the given x value
float y = y; // the given y value
float z = 1.0f - x - y;
float Y = brightness; // The given brightness value
float X = (Y / y) * x;
float Z = (Y / y) * z;
float x = x; // the given x value float y = y; // the given y value float z = 1.0f - x - y; float Y = brightness; // The given brightness value float X = (Y / y) * x; float Z = (Y / y) * z;
float x = x; // the given x value
float y = y; // the given y value
float z = 1.0f - x - y;
float Y = brightness; // The given brightness value
float X = (Y / y) * x;
float Z = (Y / y) * z;
4. Convert to RGB using Wide RGB D65 conversion
Plain text
Copy to clipboard
Open code in new window
EnlighterJS 3 Syntax Highlighter
float r = X * 1.656492f - Y * 0.354851f - Z * 0.255038f;
float g = -X * 0.707196f + Y * 1.655397f + Z * 0.036152f;
float b = X * 0.051713f - Y * 0.121364f + Z * 1.011530f;
float r = X * 1.656492f - Y * 0.354851f - Z * 0.255038f; float g = -X * 0.707196f + Y * 1.655397f + Z * 0.036152f; float b = X * 0.051713f - Y * 0.121364f + Z * 1.011530f;
float r = X * 1.656492f - Y * 0.354851f - Z * 0.255038f;
float g = -X * 0.707196f + Y * 1.655397f + Z * 0.036152f;
float b = X * 0.051713f - Y * 0.121364f + Z * 1.011530f;
5. Apply reverse gamma correction
Plain text
Copy to clipboard
Open code in new window
EnlighterJS 3 Syntax Highlighter
r = r <= 0.0031308f ? 12.92f * r : (1.0f + 0.055f) * pow(r, (1.0f / 2.4f)) - 0.055f;
g = g <= 0.0031308f ? 12.92f * g : (1.0f + 0.055f) * pow(g, (1.0f / 2.4f)) - 0.055f;
b = b <= 0.0031308f ? 12.92f * b : (1.0f + 0.055f) * pow(b, (1.0f / 2.4f)) - 0.055f;
r = r <= 0.0031308f ? 12.92f * r : (1.0f + 0.055f) * pow(r, (1.0f / 2.4f)) - 0.055f; g = g <= 0.0031308f ? 12.92f * g : (1.0f + 0.055f) * pow(g, (1.0f / 2.4f)) - 0.055f; b = b <= 0.0031308f ? 12.92f * b : (1.0f + 0.055f) * pow(b, (1.0f / 2.4f)) - 0.055f;
r = r <= 0.0031308f ? 12.92f * r : (1.0f + 0.055f) * pow(r, (1.0f / 2.4f)) - 0.055f;
g = g <= 0.0031308f ? 12.92f * g : (1.0f + 0.055f) * pow(g, (1.0f / 2.4f)) - 0.055f;
b = b <= 0.0031308f ? 12.92f * b : (1.0f + 0.055f) * pow(b, (1.0f / 2.4f)) - 0.055f;
6. Convert the RGB values to your color object
The rgb values from the above formulas are between 0.0 and 1.0.
HSV to RGB
But what if you have a color defined in HSV (Hue/Saturation/Brightness) instead of RGB or xy? Well then we can first convert from HSV to RGB, and then from RGB to xy. In this case we assume that Hue is between 0 and 360 degrees, and saturation and brightness between 0 and 100%.
Plain text
Copy to clipboard
Open code in new window
EnlighterJS 3 Syntax Highlighter
float s = S/100;
float v = V/100;
float C = s*v;
float X = C*(1-fabs(fmod(H/60.0, 2)-1));
float m = v-C;
float r,g,b;
if(H >= 0 && H < 60){
r = C, g = X, b = 0;
}
else if(H >= 60 && H < 120){
r = X, g = C, b = 0;
}
else if(H >= 120 && H < 180){
r = 0, g = C, b = X;
}
else if(H >= 180 && H < 240){
r = 0, g = X, b = C;
}
else if(H >= 240 && H < 300){
r = X, g = 0, b = C;
}
else{
r = C, g = 0, b = X;
}
int R = r+m;
int G = g+m;
int B = b+m;
float s = S/100; float v = V/100; float C = s*v; float X = C*(1-fabs(fmod(H/60.0, 2)-1)); float m = v-C; float r,g,b; if(H >= 0 && H < 60){ r = C, g = X, b = 0; } else if(H >= 60 && H < 120){ r = X, g = C, b = 0; } else if(H >= 120 && H < 180){ r = 0, g = C, b = X; } else if(H >= 180 && H < 240){ r = 0, g = X, b = C; } else if(H >= 240 && H < 300){ r = X, g = 0, b = C; } else{ r = C, g = 0, b = X; } int R = r+m; int G = g+m; int B = b+m;
float s = S/100;
float v = V/100;
float C = s\*v;
float X = C\*(1-fabs(fmod(H/60.0, 2)-1));
float m = v-C;
float r,g,b;
if(H >= 0 && H < 60){
    r = C, g = X, b = 0;
}
else if(H >= 60 && H < 120){
    r = X, g = C, b = 0;
}
else if(H >= 120 && H < 180){
    r = 0, g = C, b = X;
}
else if(H >= 180 && H < 240){
    r = 0, g = X, b = C;
}
else if(H >= 240 && H < 300){
    r = X, g = 0, b = C;
}
else{
    r = C, g = 0, b = X;
}
int R = r+m;
int G = g+m;
int B = b+m;
The resulting RGB values are already between 0 and 1, so from here you can start with step 2 of the RGB to xy section.
This note describes some aspects of the performance of the hue system for light control. These can be used by the application designer to optimally use the hue system without overloading it. The reader of this document is expected to be familiar with the Philips hue API description and usage. The Philips hue API is a RESTful interface over HTTPS for controlling the hue lights.
It is strongly advised to send less commands than the maximum indicated in this note, otherwise the ZigBee network of the hue system may not function correctly with other commands on the network, e.g. hue Tap. For any feature where you need to send fast light updates for an extended period of time, you must use the dedicated Hue Entertainment Streaming API.
Aspects of System Performance
In this note, the following aspects of the hue system performance will be discussed:
System latency:
This is the time between sending a hue API command to the bridge and completion of the light effect on the lamp, e.g. setting a lamp to certain brightness and color when transitiontime=0 is used.
System throughput:
This is the number of light effects per second that can be handled by the hue bridge (and the rest of the system).
Also, some special situations will be discussed, in which the performance of the system can deviate from the normal latency and throughput behavior.
System Latency
Using the CLIP interface, an application can dispatch light commands into the bridge. The bridge will translate these commands into (one or more) corresponding ZigBee message(s). These messages will be transmitted over the ZigBee network; the lamp(s) will receive these message(s), and update their light state(s). The system latency is defined as the time between sending a hue API command (CLIP command in image) to the bridge and completion of the light effect on the lamp, e.g. setting a lamp to certain brightness and color – when using parameter transitiontime=0 (i.e. immediate transition).
Table 1 below summarizes the system latency that one can expect. As obvious from the table, this latency depends on the number of ZigBee messages that result out of the hue API command – details of this translation will be discussed in the Translation of hue API commands section below. The system latencies listed in Table 1 have been measured under the following conditions:
he hue API command is controlling a single lamp (unicast message)
The lamp is already on
The parameter transitiontime is set to 0
The lamp can be reached via a single ZigBee hop
A wired Ethernet connection is used between PC or app and router and between router and hue bridge (being independent of Wifi latencies)
There is no background ZigBee traffic (such as software download)
The maximum system throughput rate from the System Throughput section is respected
The values in the table are averages from a series of measurements; variations of about +/-5 ms are typical.
Table 1: Average latency for various hue API messages
#ZigBee messages per hue API command
parameters used in body of hue API command (example)
average latency
1
brightness
55 ms
2
brightness + color
95 ms
3
brightness + color + on
125 ms
Translation of Hue API Commands to ZigBee Messages
The bridge has to translate the set of parameters in the hue API command into one or more ZigBee messages; Table 1 above summarizes the number of ZigBee messages that are transmitted by the bridge as result of the parameters used in a single hue API command. As an example, a hue API command with “bri” and “sat” parameters, will be translated into 2 ZigBee messages.
As a consequence, for optimal performance, the application should not send superfluous parameters in a hue API command, e.g. there is no need to include an “on” parameter in the hue API command when a lamp is already (known to be) on, and no need to include a “bri” parameter when only the color of a lamp needs to be updated.
Table 2: Translation of hue API commands to ZigBee messages
Parameters used in body of hue API command
#ZigBee messages
bri
1
hue
1
sat
1
xy
1
ct
1
on
1
transitiontime
02
bri + xy
2
bri + xy + on
3
bri + hue
2
bri + sat
2
bri + hue + sat
2
bri + hue + sat + on
3
bri + ct
2
bri + ct + on
3
System Throughput
Hue API commands are dispatched by an application into the bridge. The bridge will translate these into corresponding ZigBee message(s), and transmit those. In this process, the bridge will take into account the known throughput of the various parts of the system, and maximum allowed ZigBee messages indicated in the ZigBee standard, and will schedule messages for ZigBee transmission at a corresponding rate (“throttling” to prevent overloading the ZigBee network). Apart from the ZigBee messages resulting from the CLIP commands sent by your application, other ZigBee messages are also sent and received by the bridge (e.g. scene setting due to hue tap switch, system housekeeping, software download, ..).
The throttling takes into account the combined system load of these messages of various sources. The available system throughput (from the hue API) is thus restricted by the number of ZigBee messages per second that can be handled by the system, which is approximately 25 ZigBee messages/s. Depending on the number of ZigBee messages that result from a hue API command, the throughput (in hue API commands/s) and time between consecutive hue API commands as illustrated in Table 3 can be derived.
Table 3: Throughput for various hue API commands
#ZigBee messages per hue API command
Parameters used in body of hue API command (example)
System throughput
Time between hue API messages
1
setting brightness
brightness
40 ms
1
setting brightness+color
25 hue API commands/s
80 ms
3
setting brightness + color+on
2 hue API commands/s
120 ms
As soon as an application exceeds these rates, buffering will occur in the bridge, which will significantly increase the latency for following commands. Therefore, exceeding these rates should be avoided.
Special Situations
In certain situations, the performance of the system can deviate from the latency and throughput mentioned in the previous sections. This section will discuss some situations, and provide tips how to avoid them.
Clogging
As indicated in the System Throughput section, sending hue API commands at a rate exceeding the throughput limit will cause the commands to be piled up inside the bridge (“buffering”), leading to considerable latency increase. Worst case this can be several seconds.
When exceeding the throughput limit (and hence buffering occurring), there is no direct indication to the application that buffering is occurring – so (initially) the application is unaware of the buffering, and the latency will be significantly larger than described above. When the application continues to send at such a rate exceeding the capabilities of the system, after some time the buffer in bridge will become full, and the hue API command will be dropped, and an error similar to this one is reported in the reply to the hue API command that got dropped:
The described latency and throughput behavior assumes that a single application is controlling the system. In case of multiple applications sending hue API commands, the available resources in the system have to be shared, resulting in that these applications will experience a reduced throughput and increased latency.
Interruptions in IP Connection
The latency and throughput figures reported in the preceding sections are relevant for a wired Ethernet connection from the device sending the hue API commands to the bridge. If this wired connection is replaced with a wireless connection, it results in additional latencies, e.g. 4 ms in a particular test setup, which is small compared to the total latency described in the above Translation of hue API commands section.
However, in specific situations where a packet gets lost on the wireless connection between the device supplying the hue API commands and the access point, it can result in latencies of several seconds. Different access points can give quite different results and drop rates of this phenomenon. Suggested workaround to such wireless issues: Use a wired connection in case optimum performance is required.
ZigBee Multi-Hop Network
As all wireless communication, ZigBee transmissions signals are dependent on the environment, and can get weaker due to increased distance, reflections or obstructions. When two devices within a ZigBee network are not within reach of each other, intermediate nodes could relay the signal. This is called hopping and is arranged automatically. When hopping is applicable for the connection between the bridge and a light, the latency will increase and the throughput will decrease. To get optimal performance we suggest placing the bridge nearby or at least in the same room as the lights that need to be controlled.
Group Commands
The system also supports group commands via the hue API. This group command will be translated in a broadcast message on the ZigBee network. The ZigBee standard puts a limitation of the number of broadcast messages of around 1 per second to prevent possible overloading on the ZigBee network. Care should be taken to limit the number of group commands, as they will also limit the unicast commands. From an application one should balance the group and single light commands.
Entertainment API
The previous explanations were related to the REST API. Sometimes there are use cases such as syncing lights with entertainment content where you need to send fast updates to multiple lights for an extended period of time. In that case, the REST API should not be used, and instead the dedicated Hue Entertainment Streaming API should be used which is specifically designed for that purpose.
Conclusion
As a general guideline we always recommend to our developers to stay at roughly 10 commands per second to the /lights resource with a 100ms gap between each API call. For /groups commands you should keep to a maximum of 1 per second. It is however always recommended to take into consideration the above information and to of course stress test your app/system to find the optimal values for your application. For updating multiple lights at a high update rate for more than just a few seconds, the dedicated Entertainment Streaming API must be used instead of the REST API.
We attend hackathons with our developer kits and have a chance to work with developers directly trying out hue for the first time. What we have found pretty consistent is that people find the hue API easy to use.
But that doesn’t mean it’s easy for them to complete their application. Once developers start using hue they start find out a bit more about non-functional characteristics, like performance. There is a very simple component to this which people quite often fall over: transition time. Transition time is an attribute on light state. So when you set the light state there will be a transition time. However it is an optional attribute. If you don’t set it specifically, it will use the default. Transition time is set in hundred milliseconds increments. The default is 4, meaning 400 ms. So if you are changing the light state from red to blue it will do that over 400 milliseconds – by default. This is a pleasing transition for day to day use. However it is not what you need for a rapidly responsive app.
In order to make the light change its state quickly, set the transition time to zero. Also note that the transition time attribute is not persistent, it will reset to 400 ms (4) unless you set it specifically each time you set the light state!
Color gamut of color bulb. Some bulbs do not properly return the Gamut information. In this case this is not present.
red: required(object)
CIE XY gamut position
x: required(number – minimum: 0 – maximum: 1)
X position in color gamut
y: required(number – minimum: 0 – maximum: 1)
Y position in color gamut
green: required(object)
CIE XY gamut position
x: required(number – minimum: 0 – maximum: 1)
X position in color gamut
y: required(number – minimum: 0 – maximum: 1)
Y position in color gamut
blue: required(object)
CIE XY gamut position
x: required(number – minimum: 0 – maximum: 1)
X position in color gamut
y: required(number – minimum: 0 – maximum: 1)
Y position in color gamut
gamut_type: required(one of A, B, C, other)
The gammut types supported by hue – A Gamut of early Philips color-only products – B Limited gamut of first Hue color products – C Richer color gamut of Hue white and color ambiance products – other Color gamut of non-hue products with non-hue gamuts resp w/o gamut
dynamics: (object)
status: required(one of dynamic_palette, none)
Current status of the lamp with dynamics.
status_values: required(array of SupportedDynamicStatus)
Statuses in which a lamp could be when playing dynamics.
speed: required(number – minimum: 0 – maximum: 1)
speed of dynamic palette or effect. The speed is valid for the dynamic palette if the status is dynamic_palette or for the corresponding effect listed in status. In case of status none, the speed is not valid
speed_valid: required(boolean)
Indicates whether the value presented in speed is valid
alert: (object)
action_values: required(array of AlertEffectType)
Alert effects that the light supports.
signaling: (object)
Feature containing signaling properties.
signal_values: required(array of SupportedSignals)
Signals that the light supports.
status: (object)
Indicates status of active signal. Not available when inactive.
signal: required(one of no_signal, on_off, on_off_color, alternating)
Indicates which signal is currently active.
estimated_end: required(datetime)
Timestamp indicating when the active signal is expected to end. Value is not set if there is no_signal
colors: required(array of ColorFeatureBasicGet)
Colors that were provided for the active effect.
Items: ColorFeatureBasicGet
xy: required(object)
CIE XY gamut position
x: required(number – minimum: 0 – maximum: 1)
X position in color gamut
y: required(number – minimum: 0 – maximum: 1)
Y position in color gamut
mode: required(one of normal, streaming)
gradient: (object)
Basic feature containing gradient properties.
points: required(array of GradientPointGet – maxItems: 5)
Collection of gradients points. For control of the gradient points through a PUT a minimum of 2 points need to be provided.
Items: GradientPointGet
color: required(object)
xy: required(object)
CIE XY gamut position
x: required(number – minimum: 0 – maximum: 1)
X position in color gamut
y: required(number – minimum: 0 – maximum: 1)
Y position in color gamut
mode: required(one of interpolated_palette, interpolated_palette_mirrored, random_pixelated)
Mode in which the points are currently being deployed. If not provided during PUT/POST it will be defaulted to interpolated_palette
points_capable: required(integer)
Number of color points that gradient lamp is capable of showing with gradience.
mode_values: required(array of SupportedGradientModes)
Modes a gradient device can deploy the gradient palette of colors
pixel_count: (integer)
Number of pixels in the device
effects: (object)
status_values: required(array of SupportedEffects)
Possible status values in which a light could be when playing an effect.
status: required(one of prism, opal, glisten, sparkle, fire, candle, no_effect)
Current status values the light is in regarding effects
effect_values: required(array of SupportedEffects)
Possible effect values you can set in a light.
timed_effects: (object)
status_values: required(array of SupportedTimedEffects)
Possible status values in which a light could be when playing a timed effect.
status: required(one of sunrise, sunset, no_effect)
Current status values the light is in regarding timed effects
effect_values: required(array of SupportedTimedEffects)
Possible timed effect values you can set in a light.
powerup: (object)
Feature containing properties to configure powerup behaviour of a lightsource.
preset: required(one of safety, powerfail, last_on_state, custom)
When setting the custom preset the additional properties can be set. For all other presets, no other properties can be included.
configured: required(boolean)
Indicates if the shown values have been configured in the lightsource.
on: required(object)
mode: required(one of on, toggle, previous)
State to activate after powerup. On will use the value specified in the “on” property. When setting mode “on”, the on property must be included. Toggle will alternate between on and off on each subsequent power toggle. Previous will return to the state it was in before powering off.
on: (object)
on: required(boolean)
On/Off state of the light on=true, off=false
dimming: (object)
mode: required(one of dimming, previous)
Dimming will set the brightness to the specified value after power up. When setting mode “dimming”, the dimming property must be included. Previous will set brightness to the state it was in before powering off.
dimming: (object)
brightness: required(number – maximum: 100)
Brightness percentage. value cannot be 0, writing 0 changes it to lowest possible brightness
color: (object)
mode: required(one of color_temperature, color, previous)
State to activate after powerup. Availability of “color_temperature” and “color” modes depend on the capabilities of the lamp. Colortemperature will set the colortemperature to the specified value after power up. When setting color_temperature, the color_temperature property must be included Color will set the color tot he specified value after power up. When setting color mode, the color property must be included Previous will set color to the state it was in before powering off.
function: (one of functional, decorative, mixed, unknown)
Function of the lightservice
identify: (object)
action: required(identify)
identify: Triggers a visual identification sequence, current implemented as (which can change in the future): Bridge performs Zigbee LED identification cycles for 5 seconds Lights perform one breathe cycle Sensors perform LED identification cycles for 15 seconds
on: (object)
on: (boolean)
On/Off state of the light on=true, off=false
dimming: (object)
brightness: (number – maximum: 100)
Brightness percentage. value cannot be 0, writing 0 changes it to lowest possible brightness
dimming_delta: (object)
action: required(one of up, down, stop)
brightness_delta: (number – maximum: 100)
Brightness percentage of full-scale increase delta to current dimlevel. Clip at Max-level or Min-level.
color_temperature: (object)
mirek: (integer – minimum: 153 – maximum: 500)
color temperature in mirek or null when the light color is not in the ct spectrum
color_temperature_delta: (object)
action: required(one of up, down, stop)
mirek_delta: (integer – maximum: 347)
Mirek delta to current mirek. Clip at mirek_minimum and mirek_maximum of mirek_schema.
color: (object)
xy: (object)
CIE XY gamut position
x: required(number – minimum: 0 – maximum: 1)
X position in color gamut
y: required(number – minimum: 0 – maximum: 1)
Y position in color gamut
dynamics: (object)
duration: (integer)
Duration of a light transition or timed effects in ms.
speed: (number – minimum: 0 – maximum: 1)
speed of dynamic palette or effect. The speed is valid for the dynamic palette if the status is dynamic_palette or for the corresponding effect listed in status. In case of status none, the speed is not valid
alert: (object)
action: required(breathe)
signaling: (object)
Feature containing signaling properties.
signal: required(one of no_signal, on_off, on_off_color, alternating)
“no_signal”: No signal is active. Write “no_signal” to stop active signal. “on_off”: Toggles between max brightness and Off in fixed color. “on_off_color”: Toggles between off and max brightness with color provided. “alternating”: Alternates between 2 provided colors.
duration: required(integer)
Duration has a max of 65534000 ms and a stepsize of 1 second. Values inbetween steps will be rounded. Duration is ignored for no_signal.
colors: (array of ColorFeatureBasicPut – minItems: 1 – maxItems: 2)
List of colors to apply to the signal (not supported by all signals)
Items: ColorFeatureBasicPut
xy: (object)
CIE XY gamut position
x: required(number – minimum: 0 – maximum: 1)
X position in color gamut
y: required(number – minimum: 0 – maximum: 1)
Y position in color gamut
gradient: (object)
Basic feature containing gradient properties.
points: required(array of GradientPointPut – maxItems: 5)
Collection of gradients points. For control of the gradient points through a PUT a minimum of 2 points need to be provided.
Items: GradientPointPut
color: required(object)
xy: (object)
CIE XY gamut position
x: required(number – minimum: 0 – maximum: 1)
X position in color gamut
y: required(number – minimum: 0 – maximum: 1)
Y position in color gamut
mode: (one of interpolated_palette, interpolated_palette_mirrored, random_pixelated)
Mode in which the points are currently being deployed. If not provided during PUT/POST it will be defaulted to interpolated_palette
effects: (object)
effect: (one of prism, opal, glisten, sparkle, fire, candle, no_effect)
timed_effects: (object)
effect: (one of sunrise, sunset, no_effect)
duration: (integer)
Duration is mandatory when timed effect is set except for no_effect. Resolution decreases for a larger duration. e.g Effects with duration smaller than a minute will be rounded to a resolution of 1s, while effects with duration larger than an hour will be arounded up to a resolution of 300s. Duration has a max of 21600000 ms.
powerup: (object)
Feature containing properties to configure powerup behaviour of a lightsource.
preset: required(one of safety, powerfail, last_on_state, custom)
When setting the custom preset the additional properties can be set. For all other presets, no other properties can be included.
on: (object)
mode: required(one of on, toggle, previous)
State to activate after powerup. On will use the value specified in the “on” property. When setting mode “on”, the on property must be included. Toggle will alternate between on and off on each subsequent power toggle. Previous will return to the state it was in before powering off.
on: (object)
on: (boolean)
On/Off state of the light on=true, off=false
dimming: (object)
mode: required(one of dimming, previous)
Dimming will set the brightness to the specified value after power up. When setting mode “dimming”, the dimming property must be included. Previous will set brightness to the state it was in before powering off.
dimming: (object)
brightness: (number – maximum: 100)
Brightness percentage. value cannot be 0, writing 0 changes it to lowest possible brightness
color: (object)
mode: required(one of color_temperature, color, previous)
State to activate after powerup. Availability of “color_temperature” and “color” modes depend on the capabilities of the lamp. Colortemperature will set the colortemperature to the specified value after power up. When setting color_temperature, the color_temperature property must be included Color will set the color tot he specified value after power up. When setting color mode, the color property must be included Previous will set color to the state it was in before powering off.
color_temperature: (object)
mirek: (integer – minimum: 153 – maximum: 500)
color temperature in mirek or null when the light color is not in the ct spectrum
Color gamut of color bulb. Some bulbs do not properly return the Gamut information. In this case this is not present.
red: required(object)
CIE XY gamut position
x: required(number – minimum: 0 – maximum: 1)
X position in color gamut
y: required(number – minimum: 0 – maximum: 1)
Y position in color gamut
green: required(object)
CIE XY gamut position
x: required(number – minimum: 0 – maximum: 1)
X position in color gamut
y: required(number – minimum: 0 – maximum: 1)
Y position in color gamut
blue: required(object)
CIE XY gamut position
x: required(number – minimum: 0 – maximum: 1)
X position in color gamut
y: required(number – minimum: 0 – maximum: 1)
Y position in color gamut
gamut_type: required(one of A, B, C, other)
The gammut types supported by hue – A Gamut of early Philips color-only products – B Limited gamut of first Hue color products – C Richer color gamut of Hue white and color ambiance products – other Color gamut of non-hue products with non-hue gamuts resp w/o gamut
dynamics: (object)
status: required(one of dynamic_palette, none)
Current status of the lamp with dynamics.
status_values: required(array of SupportedDynamicStatus)
Statuses in which a lamp could be when playing dynamics.
speed: required(number – minimum: 0 – maximum: 1)
speed of dynamic palette or effect. The speed is valid for the dynamic palette if the status is dynamic_palette or for the corresponding effect listed in status. In case of status none, the speed is not valid
speed_valid: required(boolean)
Indicates whether the value presented in speed is valid
alert: (object)
action_values: required(array of AlertEffectType)
Alert effects that the light supports.
signaling: (object)
Feature containing signaling properties.
signal_values: required(array of SupportedSignals)
Signals that the light supports.
status: (object)
Indicates status of active signal. Not available when inactive.
signal: required(one of no_signal, on_off, on_off_color, alternating)
Indicates which signal is currently active.
estimated_end: required(datetime)
Timestamp indicating when the active signal is expected to end. Value is not set if there is no_signal
colors: required(array of ColorFeatureBasicGet)
Colors that were provided for the active effect.
Items: ColorFeatureBasicGet
xy: required(object)
CIE XY gamut position
x: required(number – minimum: 0 – maximum: 1)
X position in color gamut
y: required(number – minimum: 0 – maximum: 1)
Y position in color gamut
mode: required(one of normal, streaming)
gradient: (object)
Basic feature containing gradient properties.
points: required(array of GradientPointGet – maxItems: 5)
Collection of gradients points. For control of the gradient points through a PUT a minimum of 2 points need to be provided.
Items: GradientPointGet
color: required(object)
xy: required(object)
CIE XY gamut position
x: required(number – minimum: 0 – maximum: 1)
X position in color gamut
y: required(number – minimum: 0 – maximum: 1)
Y position in color gamut
mode: required(one of interpolated_palette, interpolated_palette_mirrored, random_pixelated)
Mode in which the points are currently being deployed. If not provided during PUT/POST it will be defaulted to interpolated_palette
points_capable: required(integer)
Number of color points that gradient lamp is capable of showing with gradience.
mode_values: required(array of SupportedGradientModes)
Modes a gradient device can deploy the gradient palette of colors
pixel_count: (integer)
Number of pixels in the device
effects: (object)
status_values: required(array of SupportedEffects)
Possible status values in which a light could be when playing an effect.
status: required(one of prism, opal, glisten, sparkle, fire, candle, no_effect)
Current status values the light is in regarding effects
effect_values: required(array of SupportedEffects)
Possible effect values you can set in a light.
timed_effects: (object)
status_values: required(array of SupportedTimedEffects)
Possible status values in which a light could be when playing a timed effect.
status: required(one of sunrise, sunset, no_effect)
Current status values the light is in regarding timed effects
effect_values: required(array of SupportedTimedEffects)
Possible timed effect values you can set in a light.
powerup: (object)
Feature containing properties to configure powerup behaviour of a lightsource.
preset: required(one of safety, powerfail, last_on_state, custom)
When setting the custom preset the additional properties can be set. For all other presets, no other properties can be included.
configured: required(boolean)
Indicates if the shown values have been configured in the lightsource.
on: required(object)
mode: required(one of on, toggle, previous)
State to activate after powerup. On will use the value specified in the “on” property. When setting mode “on”, the on property must be included. Toggle will alternate between on and off on each subsequent power toggle. Previous will return to the state it was in before powering off.
on: (object)
on: required(boolean)
On/Off state of the light on=true, off=false
dimming: (object)
mode: required(one of dimming, previous)
Dimming will set the brightness to the specified value after power up. When setting mode “dimming”, the dimming property must be included. Previous will set brightness to the state it was in before powering off.
dimming: (object)
brightness: required(number – maximum: 100)
Brightness percentage. value cannot be 0, writing 0 changes it to lowest possible brightness
color: (object)
mode: required(one of color_temperature, color, previous)
State to activate after powerup. Availability of “color_temperature” and “color” modes depend on the capabilities of the lamp. Colortemperature will set the colortemperature to the specified value after power up. When setting color_temperature, the color_temperature property must be included Color will set the color tot he specified value after power up. When setting color mode, the color property must be included Previous will set color to the state it was in before powering off.
Group associated with this Scene. All services in the group are part of this scene. If the group is changed the scene is update (e.g. light added/removed)
Group associated with this Scene. All services in the group are part of this scene. If the group is changed the scene is update (e.g. light added/removed)
Group associated with this Scene. All services in the group are part of this scene. If the group is changed the scene is update (e.g. light added/removed)
References all services aggregating control and state of children in the group. This includes all services grouped in the group hierarchy given by child relation This includes all services of a device grouped in the group hierarchy given by child relation Aggregation is per service type, ie every service type which can be grouped has a corresponding definition of grouped type Supported types: – grouped_light – grouped_motion – grouped_light_level
References all services aggregating control and state of children in the group. This includes all services grouped in the group hierarchy given by child relation This includes all services of a device grouped in the group hierarchy given by child relation Aggregation is per service type, ie every service type which can be grouped has a corresponding definition of grouped type Supported types: – grouped_light – grouped_motion – grouped_light_level
References all services aggregating control and state of children in the group. This includes all services grouped in the group hierarchy given by child relation This includes all services of a device grouped in the group hierarchy given by child relation Aggregation is per service type, ie every service type which can be grouped has a corresponding definition of grouped type Supported types: – grouped_light – grouped_motion – grouped_light_level
References all services aggregating control and state of children in the group. This includes all services grouped in the group hierarchy given by child relation This includes all services of a device grouped in the group hierarchy given by child relation Aggregation is per service type, ie every service type which can be grouped has a corresponding definition of grouped type Supported types: – grouped_light – grouped_motion – grouped_light_level
References all services aggregating control and state of children in the group. This includes all services grouped in the group hierarchy given by child relation This includes all services of a device grouped in the group hierarchy given by child relation Aggregation is per service type, ie every service type which can be grouped has a corresponding definition of grouped type Supported types: – grouped_light – grouped_motion – grouped_light_level
References all services aggregating control and state of children in the group. This includes all services grouped in the group hierarchy given by child relation This includes all services of a device grouped in the group hierarchy given by child relation Aggregation is per service type, ie every service type which can be grouped has a corresponding definition of grouped type Supported types: – grouped_light – grouped_motion – grouped_light_level
Joined on control & aggregated on state.| – “on” is true if any light in the group is on
on: (boolean)
On/Off state of the light on=true, off=false
dimming: (object)
Joined dimming control – “dimming.brightness” contains average brightness of group containing turned-on lights only.
brightness: (number – maximum: 100)
Brightness percentage. value cannot be 0, writing 0 changes it to lowest possible brightness
dimming_delta: (object)
action: required(one of up, down, stop)
brightness_delta: (number – maximum: 100)
Brightness percentage of full-scale increase delta to current dimlevel. Clip at Max-level or Min-level.
color_temperature: (object)
Joined color temperature control
mirek: (integer – minimum: 153 – maximum: 500)
color temperature in mirek or null when the light color is not in the ct spectrum
color_temperature_delta: (object)
action: required(one of up, down, stop)
mirek_delta: (integer – maximum: 347)
Mirek delta to current mirek. Clip at mirek_minimum and mirek_maximum of mirek_schema.
color: (object)
Joined color control
xy: (object)
CIE XY gamut position
x: required(number – minimum: 0 – maximum: 1)
X position in color gamut
y: required(number – minimum: 0 – maximum: 1)
Y position in color gamut
alert: (object)
Joined alert control
action: required(breathe)
signaling: (object)
Feature containing basic signaling properties.
signal: required(one of no_signal, on_off, on_off_color, alternating)
“no_signal”: No signal is active. Write “no_signal” to stop active signal. “on_off”: Toggles between max brightness and Off in fixed color. “on_off_color”: Toggles between off and max brightness with color provided. “alternating”: Alternates between 2 provided colors.
duration: required(integer)
Duration has a max of 65534000 ms and a stepsize of 1 second. Values inbetween steps will be rounded. Duration is ignored for no_signal.
colors: (array of ColorFeatureBasicPut – minItems: 1 – maxItems: 2)
List of colors to apply to the signal (not supported by all signals)
Items: ColorFeatureBasicPut
xy: (object)
CIE XY gamut position
x: required(number – minimum: 0 – maximum: 1)
X position in color gamut
y: required(number – minimum: 0 – maximum: 1)
Y position in color gamut
dynamics: (object)
duration: (integer)
Duration of a light transition or timed effects in ms.
By default archetype given by manufacturer. Can be changed by user.
usertest: (object)
status: required(one of set, changing)
usertest: required(boolean)
Activates or extends user usertest mode of device for 120 seconds. false deactivates usertest mode. In usertest mode, devices report changes in state faster and indicate state changes on device LED (if applicable)
device_mode: (object)
status: required(one of set, changing)
mode: required(one of switch_single_rocker, switch_single_pushbutton, switch_dual_rocker, switch_dual_pushbutton)
current mode (on read) or requested mode (on write) of the device
mode_values: required(array of DeviceModeType)
the modes that the device supports
services: required(array of ResourceIdentifier)
References all services providing control and state of the device.
By default archetype given by manufacturer. Can be changed by user.
identify: (object)
action: required(identify)
identify: Triggers a visual identification sequence, current implemented as (which can change in the future): Bridge performs Zigbee LED identification cycles for 5 seconds Lights perform one breathe cycle Sensors perform LED identification cycles for 15 seconds
usertest: (object)
usertest: (boolean)
Activates or extends user usertest mode of device for 120 seconds. false deactivates usertest mode. In usertest mode, devices report changes in state faster and indicate state changes on device LED (if applicable)
device_mode: (object)
mode: required(one of switch_single_rocker, switch_single_pushbutton, switch_dual_rocker, switch_dual_pushbutton)
current mode (on read) or requested mode (on write) of the device
By default archetype given by manufacturer. Can be changed by user.
usertest: (object)
status: required(one of set, changing)
usertest: required(boolean)
Activates or extends user usertest mode of device for 120 seconds. false deactivates usertest mode. In usertest mode, devices report changes in state faster and indicate state changes on device LED (if applicable)
device_mode: (object)
status: required(one of set, changing)
mode: required(one of switch_single_rocker, switch_single_pushbutton, switch_dual_rocker, switch_dual_pushbutton)
current mode (on read) or requested mode (on write) of the device
mode_values: required(array of DeviceModeType)
the modes that the device supports
services: required(array of ResourceIdentifier)
References all services providing control and state of the device.
state: required(one of no_update, update_pending, ready_to_install, installing)
software update status of the device.
no_update – No software update available known for the device – update_pending – There is an update pending but not ready to install. (means the update is known, but transfer has not started or completed) – ready_to_install – The update is ready to be installed. – installing – The update is being installed.
problems: required(array of DeviceSoftwareUpdateProblem)
Problems with software update that need user intervention
status of the power source of a device, only for battery powered devices.
normal – battery level is sufficient – low – battery level low, some features (e.g. software update) might stop working, please change battery soon – critical – battery level critical, device can fail any moment
status of the power source of a device, only for battery powered devices.
normal – battery level is sufficient – low – battery level low, some features (e.g. software update) might stop working, please change battery soon – critical – battery level critical, device can fail any moment
status: required(one of connected, disconnected, connectivity_issue, unidirectional_incoming)
Connected if device has been recently been available. When indicating connectivity issues the device is powered off or has network issues When indicating unidirectional incoming the device only talks to bridge
a human-readable explanation specific to this occurrence of the problem.
/resource/service_group
API to manage service group services. These are services that aggregate their distinct children into grouped services. For example, adding one or more motion services as children will result in a grouped_motion service that aggregates the motions service report.
References all services aggregating control and state of children in the group. This includes all services grouped in the group hierarchy given by child relation This includes all services of a device grouped in the group hierarchy given by child relation Aggregation is per service type, ie every service type which can be grouped has a corresponding definition of grouped type Supported types: – grouped_light – grouped_motion – grouped_light_level
References all services aggregating control and state of children in the group. This includes all services grouped in the group hierarchy given by child relation This includes all services of a device grouped in the group hierarchy given by child relation Aggregation is per service type, ie every service type which can be grouped has a corresponding definition of grouped type Supported types: – grouped_light – grouped_motion – grouped_light_level
true when sensor is activated, false when deactivated
light: required(object)
light_level: required(integer)
Deprecated. Moved to light_level_report/light_level
light_level_valid: required(boolean)
Deprecated. Indication whether the value presented in light_level is valid
light_level_report: (object)
changed: required(datetime)
last time the value of this property is changed.
light_level: required(integer)
Light level in 10000*log10(lux) +1 measured by sensor. Logarithmic scale used because the human eye adjusts to light levels and small changes at low lux levels are more noticeable than at high lux levels. This allows use of linear scale configuration sliders.
control identifier of the switch which is unique per device. Meaning in combination with type – dots Number of dots – number Number printed on device – other a logical order of controls in switch
button: required(object)
last_event: (one of initial_press, repeat, short_release, long_release, double_short_release, long_press)
Deprecated. Move to button_report/event
button_report: (object)
updated: required(datetime)
last time the value of this property is updated.
event: required(one of initial_press, repeat, short_release, long_release, double_short_release, long_press)
event which can be send by a button control
repeat_interval: (integer)
Duration of a light transition or timed effects in ms.
event_values: (array of ButtonEvent)
list of all button events that this device supports
amount of rotation since previous event in case of repeat, amount of rotation since start in case of a start_event. Resolution = 1000 steps / 360 degree rotation.
duration of rotation since previous event in case of repeat, amount of rotation since start in case of a start_event. duration is specified in miliseconds.
rotary_report: (object)
updated: required(datetime)
last time the value of this property is updated.
action: required(one of start, repeat)
Indicate which type of rotary event is received
rotation: required(object)
direction: required(one of clock_wise, counter_clock_wise)
A rotation opposite to the previous rotation, will always start with new start command.
amount of rotation since previous event in case of repeat, amount of rotation since start in case of a start_event. Resolution = 1000 steps / 360 degree rotation.
duration of rotation since previous event in case of repeat, amount of rotation since start in case of a start_event. duration is specified in miliseconds.
rotary_report: (object)
updated: required(datetime)
last time the value of this property is updated.
action: required(one of start, repeat)
Indicate which type of rotary event is received
rotation: required(object)
direction: required(one of clock_wise, counter_clock_wise)
A rotation opposite to the previous rotation, will always start with new start command.
amount of rotation since previous event in case of repeat, amount of rotation since start in case of a start_event. Resolution = 1000 steps / 360 degree rotation.
duration of rotation since previous event in case of repeat, amount of rotation since start in case of a start_event. duration is specified in miliseconds.
#- non_critical: Defines a dependency between resources: although source is impacted by removal of target, source remains of target means removal of source.
critical: Defines a critical dependency between resources: source cannot function without target, hence removal of target means removal of source.
status: required(one of initializing, running, disabled, errored)
Script status. If the script is in the errored state then check errors for more details about the error.
configuration_type: required(one of screen, monitor, music, 3dspace, other)
Defines for which type of application this channel assignment was optimized for “screen”: Channels are organized around content from a screen “monitor”: Channels are organized around content from one or several monitors “music”: Channels are organized for music synchronization “3dspace: Channels are organized to provide 3d spacial effects “other”: General use case
stream_proxy: (object)
mode: required(one of auto, manual)
Proxymode used for this group
auto – The bridge will select a proxynode automatically. – manual – The proxynode has been set manually
node: (object)
Reference to the device acting as proxy The proxynode relays the entertainment traffic and should be located in or close to all entertainment lamps in this group. The proxynode set by the application (manual) resp selected by the bridge (auto). Writing sets proxymode to “manual”. Is not allowed to be combined with attribute “proxymode”:”auto” Can be type BridgeDevice or ZigbeeDevice
Friendly name of the entertainment configuration Deprecated: use metadata/name
configuration_type: required(one of screen, monitor, music, 3dspace, other)
Defines for which type of application this channel assignment was optimized for “screen”: Channels are organized around content from a screen “monitor”: Channels are organized around content from one or several monitors “music”: Channels are organized for music synchronization “3dspace: Channels are organized to provide 3d spacial effects “other”: General use case
status: required(one of active, inactive)
Read only field reporting if the stream is active or not
active_streamer: (object)
Expected value is of a ResourceIdentifier of the type auth_v1 i.e. an application id, only available if status is active
auto – The bridge will select a proxynode automatically. – manual – The proxynode has been set manually
node: required(object)
Reference to the device acting as proxy The proxynode relays the entertainment traffic and should be located in or close to all entertainment lamps in this group. The proxynode set by the application (manual) resp selected by the bridge (auto). Writing sets proxymode to “manual”. Is not allowed to be combined with attribute “proxymode”:”auto” Can be type BridgeDevice or ZigbeeDevice
Relative equalization factor applied to the entertainment service, to compensate for differences in brightness in the entertainment configuration. Value cannot be 0, writing 0 changes it to lowest possible value.
light_services: (array of ResourceIdentifier)
List of light services that belong to this entertainment configuration Deprecated: resolve via entertainment services in locations object
configuration_type: (one of screen, monitor, music, 3dspace, other)
Defines for which type of application this channel assignment was optimized for “screen”: Channels are organized around content from a screen “monitor”: Channels are organized around content from one or several monitors “music”: Channels are organized for music synchronization “3dspace: Channels are organized to provide 3d spacial effects “other”: General use case
action: (one of start, stop)
If status is “inactive” -> write start to start streaming. Writing start when it's already active does not change the owership of the streaming. If status is “active” -> write “stop” to end the current streaming. In order to start streaming when other application is already streaming first write “stop” and then “start”
stream_proxy: (object)
mode: required(one of auto, manual)
Proxymode used for this group
auto – The bridge will select a proxynode automatically. – manual – The proxynode has been set manually
node: (object)
Reference to the device acting as proxy The proxynode relays the entertainment traffic and should be located in or close to all entertainment lamps in this group. The proxynode set by the application (manual) resp selected by the bridge (auto). Writing sets proxymode to “manual”. Is not allowed to be combined with attribute “proxymode”:”auto” Can be type BridgeDevice or ZigbeeDevice
Relative equalization factor applied to the entertainment service, to compensate for differences in brightness in the entertainment configuration. Value cannot be 0, writing 0 changes it to lowest possible value.
Friendly name of the entertainment configuration Deprecated: use metadata/name
configuration_type: required(one of screen, monitor, music, 3dspace, other)
Defines for which type of application this channel assignment was optimized for “screen”: Channels are organized around content from a screen “monitor”: Channels are organized around content from one or several monitors “music”: Channels are organized for music synchronization “3dspace: Channels are organized to provide 3d spacial effects “other”: General use case
status: required(one of active, inactive)
Read only field reporting if the stream is active or not
active_streamer: (object)
Expected value is of a ResourceIdentifier of the type auth_v1 i.e. an application id, only available if status is active
auto – The bridge will select a proxynode automatically. – manual – The proxynode has been set manually
node: required(object)
Reference to the device acting as proxy The proxynode relays the entertainment traffic and should be located in or close to all entertainment lamps in this group. The proxynode set by the application (manual) resp selected by the bridge (auto). Writing sets proxymode to “manual”. Is not allowed to be combined with attribute “proxymode”:”auto” Can be type BridgeDevice or ZigbeeDevice
Relative equalization factor applied to the entertainment service, to compensate for differences in brightness in the entertainment configuration. Value cannot be 0, writing 0 changes it to lowest possible value.
light_services: (array of ResourceIdentifier)
List of light services that belong to this entertainment configuration Deprecated: resolve via entertainment services in locations object
status: required(one of paired, pairing, unpaired)
Read only field indicating whether homekit is already paired, currently open for pairing, or unpaired. Transitions: – unpaired > pairing – pushlink button press or power cycle – pairing > paired – through HAP – pairing > unpaired – 10 minutes – paired > unpaired – homekit reset.
Reset homekit, including removing all pairings and reset state and Bonjour service to factory settings. The Homekit will start functioning after approximately 10 seconds.
status: required(one of paired, pairing, unpaired)
Read only field indicating whether homekit is already paired, currently open for pairing, or unpaired. Transitions: – unpaired > pairing – pushlink button press or power cycle – pairing > paired – through HAP – pairing > unpaired – 10 minutes – paired > unpaired – homekit reset.
Group associated with this Scene. All services in the group are part of this scene. If the group is changed the scene is update (e.g. light added/removed)
Group associated with this Scene. All services in the group are part of this scene. If the group is changed the scene is update (e.g. light added/removed)
Group associated with this Scene. All services in the group are part of this scene. If the group is changed the scene is update (e.g. light added/removed)
a human-readable explanation specific to this occurrence of the problem.
/resource/contact
API to manage contact sensor state for general purpose cases. These are offered by devices that have a static “switch” position. Not necessarily a physical switch.