A practical guide for developers who want to use AI to produce more, without depending on "magic prompts".
Based on real experience, not hype.
Structured in 3 pillars and 5 phases.
3 Pillars: (1) Treat AI as a pair programming partner where you are always the navigator and AI is always the driver. (2) Use structured context management to minimize context-switching cost. (3) Never trust AI output without verification.
5 Phases: Research (understand the project factually) → Brainstorm (discuss solutions before coding) → Plan (produce a short design summary, then a detailed spec with incremental tasks) → Execute (implement one task at a time, review each change) → Validate (test independently, watch for circular agent-written tests).
Key principles: Your review capacity is the speed limit, not AI's generation speed. Architectural decisions are human-authored. Match your generation pace to what you can verify. A sustainable 2-3x productivity gain beats an unsustainable 10x.
Start here: Set up a .context/ folder, pick a small task, apply Phases 1-2 (Research + Brainstorm), and iterate from there.
If you're like most developers, you've already tried using AI to code. Maybe you ran some prompts in ChatGPT, installed an extension in VS Code, or even bought access to Cursor, Windsurf, or GitHub Copilot.
But the result was frustrating, wasn't it?
- Generic responses that don't work for your project.
- More time fixing AI code than writing from scratch.
- The feeling that "this doesn't work for real cases."
- Fear of falling behind while other devs "master" AI.
The truth is: you're not doing anything wrong. You just don't have a method.
McKinsey tested developers on real tasks and discovered that, with the right method, it's possible to be:
- 45-50% faster at code documentation.
- ~50% faster writing new code.
- Significantly more efficient at refactoring.
The research concludes by saying:
Generative AI is poised to transform software development in a way that no other tooling or process improvement has done. Using today's class of generative AI–based tools, developers can complete tasks up to two times faster—and this is just the beginning. As the technology evolves and is seamlessly integrated within tools across the software development life cycle, it is expected to further improve the speed and even quality of the development process. But as our research shows, tooling alone is not enough to unlock the technology's full potential. A structured approach encompassing generative AI training and coaching, use case selection, workforce upskilling, and risk controls can lay a solid foundation for organizations to pursue generative AI's promise of extraordinary productivity and unparalleled software innovation.
The conclusion is clear: AI multiplies productivity when used with method. The secret isn't in the tool, but in how you integrate it into your workflow through a structured process that combines practical training, targeted coaching, well-selected use cases, and rigorous quality controls.
Additionally, the research also mentions that developers using AI tools are twice as likely to report happiness, satisfaction, and better flow state. They attributed this to the tools' ability to automate repetitive tasks that prevented them from performing more satisfying activities, and to obtain information faster than searching for solutions on the web.
Proof of this is that developers drastically decreased the number of questions created on Stack Overflow after the GPT launch in 2022.
The problem isn't AI. It's how we're using it.
- Extreme Programming with AI: AI as a fixed pair programming partner.
- Intelligent Context Switching: Strategic context management.
- Don't Trust, Verify: Verification is key.
Extreme Programming (XP) was developed and formalized by Kent Beck in the 90s as an agile software development methodology focused on continuous delivery with quality and adaptability. One of XP's core practices is Pair Programming: two developers work on the same code, alternating between "driver" (who types) and "navigator" (who reviews the written code) every 15-30 minutes. While the navigator reviews the code, they can suggest improvements, discuss ideas and direction, and evaluate complexities. This is done to relieve the driver's focus on tactical tasks, allowing them to concentrate on the current task, using the navigator as a guide and safety net.
Why XP works:
- Quality: Continuous review reduces bugs
- Knowledge: Knowledge is shared between developers through constant discussion
- Focus: Constant discussion requires attention, meaning fewer distractions.
- Learning: Exposure to different approaches, ideas, and perspectives.
The concept of pair programming is powerful, and AI can be the perfect partner: available 24/7, no ego, vast knowledge, infinite patience, and tolerates cursing calmly 🤣.
When you use AI as a pair programming partner, you maintain all the benefits of traditional XP - quality from continuous review, shared knowledge, constant focus, etc.
However, the dynamic changes: Instead of rotating roles as in traditional XP, you establish a fixed partnership where you are always the navigator (make strategic decisions, define architecture, validate results) and AI is always the driver (suggests implementations, writes code, executes instructions, etc).
This means:
- Constant discussion: You and AI converse about each decision.
- Immediate review: AI analyzes and suggests improvements in real-time. You review, validate, and suggest changes until reaching the desired result, then authorize implementation - strategically directing the AI.
- Expanded knowledge: Access to millions of tested patterns and solutions and ease of finding information.
- Total availability: AI is always ready, without time or energy limitations, only depends on your willingness and pocket to pay for more tokens.
The practical result? You can understand complex projects, summarize extensive documentation in seconds, review code with multiple perspectives, write tests, receive implementation suggestions, and generate ideas for edge cases you didn't think of - all while maintaining control and quality.
Role Definition:
- You: Navigator, Architect, Validator, Decision Maker
- AI: Driver, Implementer, Typist, Focus on the execution
- Dialogue: Constant discussion during all stages
General Rules:
- Always discuss the approach before implementing
- Use AI to generate multiple options and choose the best
- Keep specialized conversations by context
- Review and validate each suggestion before accepting and implementing
- Document important decisions for future reference
- Never generate more code than you can review - Your review capacity is the rate limiter, not AI's generation speed. Unreviewed code is unverified code, and it compounds into debt faster than you think
- Architectural boundaries, API contracts, and data models are human-authored - AI can suggest and explore options, but the human commits these decisions. These are the load-bearing walls of your system; everything downstream depends on them. Writing them yourself forces you to think through trade-offs that a generated solution would gloss over
Context switch is a concept that comes from computer science - when a processor needs to stop one task and start another, there's a cost to "switching context." Gerald Weinberg, in the book Quality Software Management: Systems Thinking, was one of the first to apply this concept to software development. He considered that context switching is the process of stopping work on a project and returning to it after performing a task on a different project. Just like in computing, this also has a cost for developers.
Weinberg discovered that when developers work on multiple projects or tasks simultaneously, productivity drops drastically, as attention is divided between different tasks. Thus, the "warm-up" time and cognitive effort to return to the previous task increase as more context switches are performed:
- 1 project: 100% productivity
- 2 projects: 40% productivity each (20% lost to context switching)
- 3 projects: 20% productivity each (40% lost)
- 4 projects: 10% productivity each (60% lost)
- 5 projects: <10% productivity each (80% lost)
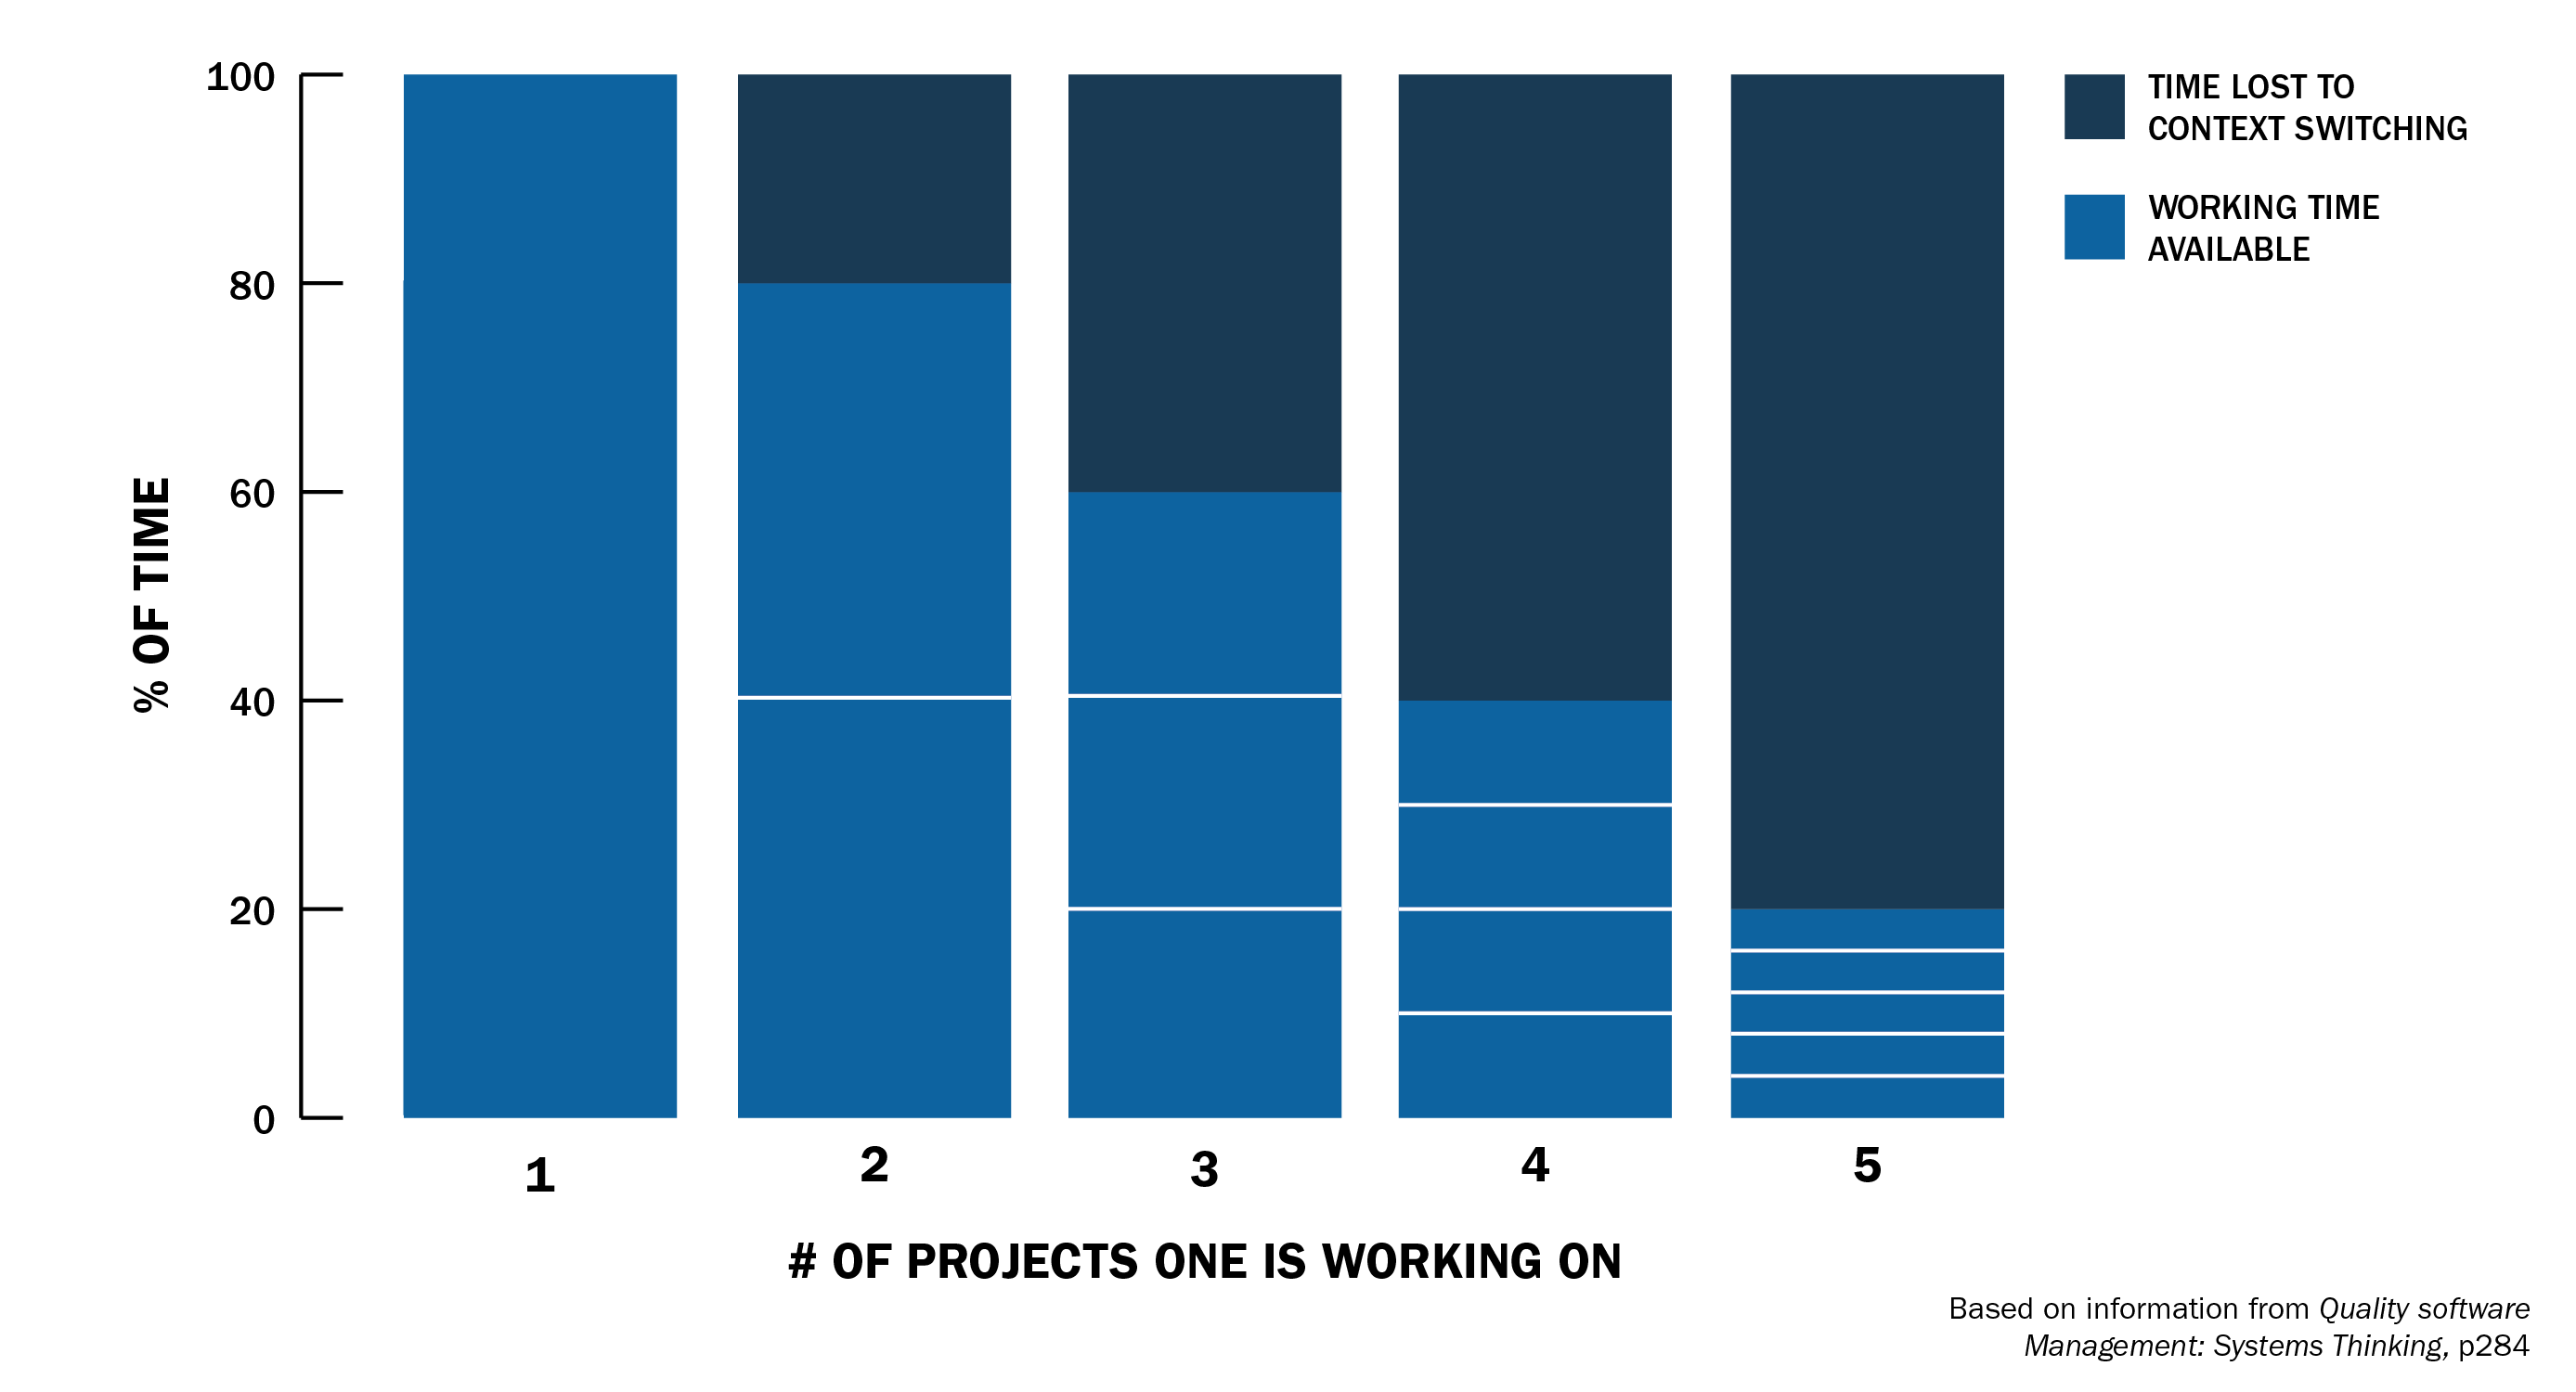
Effort Lost to Context Switching: https://www.sei.cmu.edu/blog/addressing-the-detrimental-effects-of-context-switching-with-devops
Why is this devastating for developers?
- High cognitive load: Programming requires keeping dozens of variables, assumptions, architecture, and business rules in memory
- "Warm-up" time: It takes 15-30 minutes to resume the previous mental state
- Loss of flow state: Interruptions break the state of deep concentration
- Increased bugs: Frequent context changes lead to more errors from lack of focus
Every time you stop working on the frontend to fix a bug in the backend, or leave a feature to attend a meeting, you lose not only the interruption time, but also the time to "reconnect" your brain to the original problem.
The result? A developer working on 3 different projects loses 40% of their productivity just switching context, meaning if you spend 8 hours programming, only 4.8 hours are actually productive.
AI helps you partially solve this problem because it can keep all context available. While you need 15-30 minutes to "reconnect" to the project, AI keeps all context instantly available. Just a quick read and a few questions for you to resume the task exactly where you left off. You only need to keep important decisions and references documented before switching context.
Context Management
- Create a specific conversation for each context (e.g., Backend-Auth, Frontend-Dashboard)
- Use descriptive names that clearly identify the scope
- Keep conversations focused on a single domain/project
Context Loading
- Always start sessions by loading the relevant context
- Ask for summaries of main points from the previous session
- Provide documentation, architecture, and relevant code examples
Context Saving
- Document decisions and progress at the end of each session
- Save executive summaries to facilitate resumption
- Keep a history of changes and justifications
- I usually always make a summary of the state I'm leaving the task in and what I intend to do when resuming it
The result? You drastically reduce "warm-up" time and maintain a good productivity level even alternating between different projects. Because your memory has been extended and the model accelerates the process of resuming the task.
The maxim "Don't Trust, Verify" comes from the crypto community. It's a fundamental principle in decentralized networks to not trust third parties, always verify. When using LLM models for programming, we can apply the same principle because the nature of LLMs requires constant verification, as models can hallucinate.
Large Language Models (LLMs) like GPT, Claude, and Gemini are giant neural networks trained to predict the next word in a text. Given an initial excerpt, the model calculates which word is most likely to come next, and repeats this several times until forming a complete response.
A neural network is basically a set of mathematical functions called neurons, organized in layers. Each neuron receives information, does a calculation, and sends the result forward to the next neurons. Neurons are connected by synapses, which are represented by weights - values that indicate how much one neuron influences another. During training, the model learns by adjusting these weights millions (or billions) of times until identifying patterns and generating coherent responses.
Why do they hallucinate? OpenAI explains:
Hallucinations are not bugs, but direct consequences of how models are trained and evaluated. Traditional evaluation systems reward guessing instead of honesty about uncertainty.
It's like a multiple-choice test: if you don't know the answer but guess, you have a chance of getting it right. Leaving it blank guarantees zero points. Similarly, when models are evaluated only for accuracy, they're incentivized to guess instead of saying "I don't know."
Why is this problematic in development:
- Hallucinations: LLMs invent functions, APIs, or syntaxes that don't exist
- False confidence: They respond with certainty even when they're completely wrong
- Limited context: They can lose important details of your specific project
- Outdated patterns: Training may include obsolete or insecure practices
Real hallucination example:
// ❌ AI "invented" a function that doesn't exist
const result = await usersDb.findUserByEmailAndValidate(email);

// ✅ Real function that exists
const user = await usersDb.findOne({ email });
if (!user) throw new Error('User not found');
You can learn more about why LLM models hallucinate in this OpenAI blog post: Why language models hallucinate.
Hallucinations are one class of error. But there's a subtler and arguably more dangerous problem: error compounding.
Every developer introduces small imperfections, an unnecessary abstraction, an inconsistent naming choice, a missed opportunity to reuse existing code. In a normal workflow, these stay manageable. You notice the friction when you revisit the code, you refactor during a quiet afternoon, a colleague flags it in review. The rate at which imperfections enter the codebase is naturally limited by how fast a person can write and ship code, and the feedback loop (pain, annoyance, peer pressure) keeps things in check.
When AI generates the code, both constraints disappear. Output volume increases dramatically, but the feedback loop doesn't scale with it. You can't review 2,000 lines with the same rigor you'd give 200. Meanwhile, the model doesn't carry lessons from one session to the next, it will reproduce the same questionable patterns indefinitely unless you explicitly correct them every time. And because each agent session starts with an incomplete picture of the codebase, it often misses existing utilities, duplicates logic that already exists elsewhere, or introduces patterns that conflict with decisions made in a previous session.
Individually, none of these are catastrophic. But they accumulate. Each small inconsistency makes the next change slightly harder. Duplicated logic means bugs get fixed in one place but not the other. Conflicting patterns confuse both future agents and future humans. Over weeks, the codebase drifts into a state where making reliable changes becomes increasingly expensive, not because of one big mistake, but because of hundreds of small ones that were never caught.
The takeaway: Your review capacity is the true speed limit. A developer who generates 10x more code but reviews only a fraction of it isn't 10x more productive, they're building up problems that will surface as rework later. Match your generation pace to what you can actually verify.
Before Accepting Any AI Code
Important: This is a practical checklist, not exhaustive. Use it as a starting point and adapt according to your project's specific needs and tech stack. The goal is to create a critical review habit that becomes natural in your workflow.
1. Immediate Technical Verification
- Does the code compile/execute without errors?
- Do the tests pass?
- Was fake code generated only to satisfy tests?
- Do all functions and methods actually exist?
- Are imports and dependencies correct?
2. Context Validation
- Does it make sense within your project's architecture?
- Does it follow established code patterns?
- Doesn't it break existing functionality?
- Is it really the best approach for this specific case?
3. Security Check
- Doesn't it introduce known vulnerabilities?
- Does it adequately handle errors and exceptions?
- Does it correctly validate all inputs?
- Does it follow security principles?
Always ask for explanations
- "Explain the reasoning behind this solution"
- "What are the trade-offs of this approach?"
- "What edge cases does this implementation consider?"
- "What code or documentation served as the basis for this solution?"
Request alternatives
- "Show other different ways to solve this"
- "What would be a simpler version of this solution?"
- "How do other frameworks/languages/modules/libraries solve this problem?"
- "What would be a more secure version of this solution?"
Increment the context
- Provide relevant project documentation
- Share examples of similar code already working
- Include architecture diagrams when necessary
- Provide links to framework/library documentation
- Links to tickets, pull requests, etc.
There are three main ways to work with AI in software development. Each mode has its ideal use cases, advantages, and limitations. Understanding when to use each one is fundamental to maximizing productivity.
What it is: Direct interaction through web interfaces of ChatGPT, Claude, or other LLMs.
How it works:
- You copy code/context (Ctrl+C)
- Paste in chat (Ctrl+V)
- Receive the response
- Copy back to your editor
When to use:
- Research and exploration: Understanding concepts, APIs, frameworks
- Specific debugging: Analyzing a specific error or stack trace
- Code review: Asking for analysis of a specific snippet
- Brainstorming: Discussing approaches without implementing
- Documentation: Generating or reviewing documentation
Advantages:
- ✅ No additional cost (free versions available)
- ✅ Access to newer models quickly
- ✅ Requires no configuration or installation
- ✅ Useful for conceptual discussions
- ✅ Good for learning and exploration
Limitations:
- ❌ Manual and repetitive workflow (copy/paste)
- ❌ No direct access to project files
- ❌ Limited context (you need to copy everything manually)
- ❌ Doesn't execute code or tests
- ❌ Difficult to control history between sessions
What it is: Tools integrated into your development environment (Windsurf, Cursor, GitHub Copilot, etc.)
How it works:
- AI has direct access to project files
- Can read, modify, and create files
- Executes commands and tests
- Maintains context between iterations
- Native integration with git, terminal, etc.
When to use:
- Feature implementation: Complete development of functionalities
- Refactoring: Structural changes across multiple files
- Complex debugging: Problems involving several files
- Testing: Creating and running automated tests
- Fast iteration: Multiple attempts until getting it right
Advantages:
- ✅ Complete access to the project
- ✅ Integrated workflow (no copy/paste)
- ✅ Can execute code and tests
- ✅ Maintains context
- ✅ Real-time suggestions
- ✅ Granular control over changes
- ✅ Easy to control conversation history
Limitations:
- ❌ Additional cost (~$10-30/month)
- ❌ Tool learning curve
- ❌ May consume many resources (RAM/CPU)
- ❌ Depends on stable internet
Popular tools:
- Cursor: $20/month - Fast iteration, agent mode, strong model selection
- GitHub Copilot: $10/month - Intelligent autocomplete, deep GitHub integration
- Windsurf: $15/month - Lightweight, organized, checkpoints
- Claude Code (CLI): API-based - Terminal-first, great for scripting and automation
- Continue.dev: Free - Open source, customizable, bring your own model
Cost: $10-30/month + API costs (if using own models or CLI tools)
What it is: Autonomous specialized agents that solve specific tasks from start to finish, with minimal human intervention.
How it works:
- You define the task/objective
- Agent plans execution
- Executes all steps automatically
- Validates results
- Reports completion or problems
When to use:
- Repetitive tasks: Migrations, dependency updates, mass refactoring
- Code analysis: Security audits, performance analysis, code quality
- Boilerplate generation: Scaffolding, complete CRUD, configurations
- Automated testing: Generation of complete test suites
- CI/CD: Pipeline automation, deploys, rollbacks
Advantages:
- ✅ Fully automated
- ✅ Solves complex end-to-end problems
- ✅ Specialization in specific tasks
- ✅ Consistency and repeatability
- ✅ Frees time for strategic work
- ✅ Can run in background or CI/CD
Limitations:
- ❌ Requires advanced setup and configuration
- ❌ Less granular control
- ❌ Can make incorrect decisions without supervision
- ❌ Higher cost (multiple API calls)
- ❌ More complex debugging when it fails
- ❌ Needs rigorous validation of results
Warning: Agent Mode amplifies both productivity and risk. The more autonomy you give to the agent, the less visibility you have into individual decisions, and each unreviewed decision is a potential source of drift from your standards and architecture. Autonomous agents work fast, but they don't carry context between sessions, don't know what other agents did before them, and will confidently repeat the same mistakes unless corrected. When you pair high autonomy with low oversight, small issues accumulate quietly until they surface as major problems. Use Agent Mode where the scope is narrow and verifiable, and invest proportionally more in validation as the autonomy increases.
Tools and frameworks:
- Claude Code: Anthropic's CLI agent for terminal-driven development
- Codex (OpenAI): Cloud-based autonomous coding agent
- Devin: Full development agent with its own environment
- Cursor Agent Mode: Autonomous task execution within the IDE
- Custom agents: Built with frameworks like LangChain, CrewAI, or direct API integration
This guide is focused on integrated IDE/CLI mode, which offers the best balance between control, productivity, and quality for software development.
Why IDE/CLI is the ideal mode:
- ✅ Total control over each change
- ✅ Complete context of the project available
- ✅ Fast iteration with immediate feedback
- ✅ Natural integration with your workflow
- ✅ Organized and traceable history
- ✅ Easy to customize
When to use other modes as complement:
Chat Mode - For quick research when you don't want to load complete context:
- Understand a new concept quickly
- Validate an idea before implementing
- Explore alternatives without compromising the project
Agent Mode - For automation of specific and repetitive tasks:
- Execute mass code analysis
- Automate processes
Not every task benefits from AI delegation equally. Before handing something off, ask yourself these questions:
Can you define it in isolation? The task should make sense within a clear boundary: a single module, a well-defined interface, a self-contained utility. If the agent needs to understand how five different subsystems interact to make the right call, it's not a good fit for autonomous execution.
Can the result be verified mechanically? If there are tests to run, a linter to pass, a build to succeed, or a metric to measure, the agent can close its own feedback loop. If the only way to know whether the output is correct is careful human judgment, you're adding risk by delegating.
What happens if it's subtly wrong? For throwaway scripts, internal tools, prototypes, or data transformations, a subtle mistake is cheap to find and fix. For production code that handles money, user data, or authentication, a subtle mistake is expensive. Scale your oversight accordingly.
Is the value in exploration or in the final artifact? AI is excellent at generating options, surfacing patterns you hadn't considered, and exploring the solution space broadly. When you're after ideas rather than shipping the exact output, delegation is low-risk and high-value.
Tasks to keep close:
- Architecture and API design, because these are load-bearing decisions that shape everything downstream
- Cross-module changes that require understanding how components interact
- Trade-offs that depend on business context, user behavior, or organizational constraints
- Anything where a subtle error is both costly and hard to detect
A practical test: If you can write a self-contained spec with clear acceptance criteria, it's probably a good agent task. If you'd need to narrate half the system's history for the agent to avoid making a bad call, keep it as a collaborative conversation instead.
Context Engineering is the design and management of all information provided to an AI system to optimize its performance and ensure relevant and accurate results. It goes beyond simple prompts, including structured data, tool outputs, memory, and rules. It's an evolution of prompt engineering. You can find more information in this Anthropic post: https://www.anthropic.com/engineering/effective-context-engineering-for-ai-agents .
Context Enrichment
The context you provide to the model determines the quality of responses. There are three main ways to enrich context:
1. Rules (Custom Rules)
Rules are instructions you define to guide AI behavior. Instead of using default tool settings (which consume context space with generic information), create your own rules focused on what really matters for your project.
Examples of useful rules:
- Your team's code patterns (naming, file structure)
- Project-specific security practices
- Commit and documentation conventions
- Technical restrictions (dependency versions, compatibility)
2. Output Templates
Templates define the expected format of AI responses. This ensures consistency and facilitates output integration into your workflow. For example, you can create templates for:
- Technical specifications (standardized structure for requirements, tasks, tests)
- Architectural decision documentation
- Implementation plans with estimates
- Code analysis reports
3. MCPs (Model Context Protocol)
MCPs are integrations that connect AI with external tools (databases, APIs, file systems). They expand AI capabilities beyond just reading and writing code.
Important caution: MCPs that access databases can expose sensitive data to the model. Use only with anonymized data or in isolated development environments. Never connect MCPs directly to production databases with real user data. A database MCP can make unwanted changes to the database.
Optimization tip: IDE/CLI tools usually load default configuration files automatically, consuming precious context tokens. By creating your own rules and templates, you control exactly what's loaded, optimizing context window usage for what really matters in your project.
Context Engineering Challenges
Working with context in AI isn't trivial. There are three main problems you need to manage:
1. Context Window Management
The context window is the maximum amount of information the model can process at once, measured in tokens. Tokens are pieces of text the model uses to process language - a word can be 1 token or several, depending on size and language.
Limit examples:
- GPT-4: ~128k tokens (~96k words)
- Claude 3.5 Sonnet: ~200k tokens (~150k words)
- Gemini 1.5 Pro: ~2M tokens (~1.5M words)
The problem: The more context you load (files, history, documentation), the faster you hit the limit. When this happens, the model starts to "forget" old information or simply fails.
Solution: Be strategic about what to include. Load only files relevant to the current task. Use the .context/ folder to keep external documentation that you load manually when needed, instead of letting the tool load everything automatically. Start a new conversation when you feel the model is "forgetting" old information or generating many inaccuracies. A good rule is to keep context between 40-50% of the limit, as when you add more data to context the model degrades its quality and often fails execution.
2. Context Rot
Context rot is the phenomenon where an LLM's performance and accuracy decline as context size increases. The model becomes overloaded by data volume, leading to forgetting, hallucinations, repetitive responses, and inability to focus on relevant information. Even in simple tasks, the model may ignore important details, fixate on irrelevant information, or produce off-topic responses.
Common symptoms:
- AI suggests code that contradicts recent decisions
- References to files or functions that were already removed
- Repetition of solutions that already failed previously
- Confusion about the project's current state
Solution: When you notice context rot, start a new conversation. Before starting, load an updated summary of the project's current state (this is where the .context/ folder really helps - you maintain updated documents that you can load in new conversations). Always control context size to not hit the limit and try to stay within the 40-50% range of the model's token limit.
3. Hallucination
Hallucination occurs when an LLM generates confident and plausible information, but incorrect or invented. This happens because the model predicts the next word in a sequence to create coherent text, but doesn't possess real understanding or fact-checking ability. The result is invented details, false sources, or misleading statements - not from intent to deceive, but from limitations in training and lack of factual knowledge.
As we saw in Pillar 3, LLMs can invent code, functions, or APIs that don't exist. This gets worse when context is overloaded or confused, increasing the probability of hallucinations.
Mitigation Strategies:
-
RAG (Retrieval-Augmented Generation): Connect the LLM to external databases to retrieve factual context before generating responses. In development, this means providing official documentation, existing code examples, and technical specifications.
-
Constant verification: Religiously implement the "Don't Trust, Verify" principle. Check each suggestion, validate APIs and functions, run tests, request existing code examples before accepting.
-
Quality context: Provide real examples from your project, official framework/library documentation, and links to reliable sources. The better the context, the lower the chance of hallucination.
-
Explicit feedback: When AI hallucinates, correct immediately and provide the correct information. This helps adjust the current conversation's context (but this doesn't retrain the model, only helps update the current conversation's context).
4. Instruction Saturation
Separate from the token limit, there's a practical limit on how many instructions a model can follow reliably in a single session. When you combine your system prompt, custom rules, MCP tool definitions, and the task prompt itself, the total number of discrete instructions can overwhelm the model's ability to attend to all of them consistently.
The result is selective adherence: the model follows some instructions and silently ignores others. You won't get an error; the model will just skip a rule or miss a step in your workflow. This is especially problematic when the skipped instruction was the one ensuring quality (e.g., "run tests before committing" or "ask for confirmation before proceeding").
Practical guidelines:
- Keep individual prompts focused on a single phase or concern. A prompt that tries to cover research, planning, and implementation in one shot will drop instructions
- Audit what's automatically loaded into context. Many IDE tools inject tool descriptions, MCP schemas, and default rules before you even type. That's part of your instruction budget
- If you notice the model skipping steps in your workflow, the fix is usually to break the prompt into smaller, sequential steps, not to reword or repeat the instruction louder
- When writing custom rules, favor fewer high-impact rules over many granular ones. Five clear rules will be followed more consistently than twenty detailed ones
Another strategy: .context/ Folder
All these problems led to the creation of the .context/ folder - a centralized location to keep documentation, decisions, specs, and project context in an external and controlled way.
Instead of letting the tool automatically load everything (consuming tokens and creating rot), you maintain organized documents that you load manually when needed. This gives total control over what enters the context, when it enters, and keeps everything updated and versioned. Additionally, you do more efficient Context Window management, as you can control exactly what enters the context.
The .context/ folder is the folder that contains all your project's context files. It's used to store all files used to explain to the model what's happening in your project. This folder doesn't depend on the AI tool you're using. You can keep it versioned in your repository or not. Ideally, you should document your work and keep context files updated.
I usually keep this folder at the monorepo root that I create to manage all projects I'll work on.
Here's an example of how I organize the .context/ folder:
<monorepo-root>/
├── .context/
│   ├── .config/
│   │   ├── rules/
│   │   │   ├── rule-js-best-practices.md
│   │   │   └── rule-swe-best-practices.md
│   │   └── templates/
│   │       ├── template-plan.md
│   │       └── template-spec.md
│   ├── data/
│   │   ├── data-anonimized-conversions.csv
│   │   ├── data-anonimized-customers.json
│   │   └── data-anonimized-sellers.json
│   ├── decisions/
│   │   └── decision-x.md
│   ├── projects/
│   │   └── project-x/
│   │       ├── overview.md
│   │       ├── bugs/
│   │       │   └── bug-x.md
│   │       ├── plans/
│   │       │   └── plan-x.md
│   │       ├── specs/
│   │       │   └── spec-feature-xyz.md
│   │       └── tasks/
│   │           └── task-x.md
│   └── temp/
│       └── <random>
├── frontend-app/
│   ├── src/
│   ├── public/
│   └── package.json
└── backend-api/
    ├── src/
    ├── tests/
    └── package.json
.config/ stores templates that will be used by AI agents to perform tasks, plus rules that can be added as context to the agent or in IDE rule settings. This folder is maintained as a separate git repository so I can version and share between projects.
templates/: Contains output templates to standardize AI responses.template-plan.md: Used for higher-level project planning with time and complexity estimates.template-spec.md: Used for technical detailing of what will be implemented and creating specific tasks so the agent can execute instructions and implement code changes.
rules/: Contains rules that can be added as context to the agent or in IDE rule settings. Generally these rules are related to your experience as a developer and best practices the team adopted.
data/ contains example and anonymized data for testing and analysis. Useful for providing real context to the model without exposing sensitive information.
decisions/ documents important technical and architectural decisions for future reference. Helps maintain a history of the "why" behind critical project choices.
projects/ contains one folder per monorepo project, facilitating organization of bugs, specs, plans, tasks, and the overview.md file that serves as the main context to understand each project.
temp/ is only for storing temporary files and experiments that don't need permanent organization.
Monorepo projects (like frontend-app/ and backend-api/) are the actual projects where you'll make code modifications, maintaining clear separation between context/documentation and source code.
- Choose tool (Windsurf/Cursor/etc)
- Create a monorepo
- Configure
.context/folder - Checkout other projects within the monorepo
- Create your templates and rules within
.context/.config/folder
Now that you know the 3 fundamental pillars, learned about Context Engineering, and understood how to organize your workspace, I'll share the method I developed that consistently accelerated my productivity with AI.
Most developers use AI in a reactive and random way: they ask a question, copy the answer, test the application, and when it doesn't work, try reformulating the prompt hoping for a different result. It's a frustrating cycle of trial and error without clear direction.
No matter how advanced the prompt, it can't understand your project's context and can't understand what you want to do. So learning to manage context and having a structured process is fundamental to accelerating your productivity with AI.
The problem isn't the tool - it's the lack of process.
A structured method solves this because:
- Consistency: You reach quality solutions predictably, not by luck
- Efficiency: Eliminates time wasted on unnecessary iterations
- Control: You maintain command of the process, AI is just a tool
- Flexibility: Works for both fixing simple bugs and implementing complex features
Important: Due to the non-deterministic nature of LLMs, this method doesn't guarantee the same response for the same input. What it guarantees is a consistent process that guides you to quality solutions, regardless of variations in the model's responses.
Think of the method as a decision-making framework, not a magic recipe. It structures your thinking and interaction with AI to maximize chances of success.
Results you can expect:
- 2-3x sustained productivity as you refine the process, with room to grow as the method becomes second nature
- Less frustration with code that doesn't work or needs to be redone
- More confidence in AI-generated solutions
- Less rework: a significant share of AI-driven productivity gains get eaten by fixing issues from previous sessions. A structured method reduces this rework tax
Why 2-3x and not 10x? Many sources cite higher multipliers. In practice, those numbers usually come at the cost of quality. Generating more code faster means less time reviewing it, which means more accumulated problems that surface later as rework. A sustainable 2-3x with near-human code quality produces better outcomes over weeks and months than a 10x sprint followed by a painful cleanup phase. Optimize for throughput you can sustain, not peak speed you can't maintain.
There are various methods on the internet, and you can (and should) develop yours based on your experience. This is what works for me. Use it as a starting point and adapt as needed.
Objective: Fully understand the project before any changes
- Start the IDE in Chat mode asking for project explanation
- Ask questions about architecture, patterns, limitations
- Request examples of existing code
- Ask to generate document summarizing everything
- Save in context folder as
<project-name>-overview.md
You can use a project overview template for this. Keep one in your .context/.config/templates/ folder and include it in chat so the model generates an overview in a consistent format.
Keep research factual. During this phase, avoid telling the model what you intend to build or change. If you say "I need to add a billing endpoint, research the codebase," the model will mix observations with opinions about how to implement the billing endpoint. Instead, ask neutral questions: "How do endpoints work in this project?", "What patterns does the billing module follow?", "What does the test setup look like?" The goal is to build a factual map of what exists. Decisions about what to change come in Phase 2. Mixing intent with research contaminates the foundation everything else builds on.
If you already know the project: Phase 1 isn't always a full research session. If you've been working on the codebase for months, you likely already have a mental model of how things fit together. In that case, use Phase 1 to refresh your understanding of the specific area you're about to change. Ask the model to trace the code paths relevant to your task, confirm your assumptions about how a module works, or surface recent changes you may have missed. The goal is the same (build a factual foundation), the depth just varies with how familiar you are.
Objective: Discuss EVERYTHING before implementing any changes.
- Present the problem with maximum information
- Discuss solutions as in pair programming
- Question everything, never trust 100%
- Validate assumptions with code examples
- Map risks and edge cases
Prompt Template For Brainstorm:
Problem: [detailed description]
Objective: [what to solve]
Context: [project information]
Constraints: [technical/business limitations]
Documentation: [relevant files]
Related code: [files that may be affected]
After the model's response, you should initiate discussion with it so it can explain its solution. Ask questions about:
- Other alternatives it didn't consider
- How to solve without breaking existing functionalities
- How it will impact the rest of the system or a specific module that uses the code to be changed
- Request code examples that led to the solution it proposed
- What risks to consider
- How to test adequately
- What can be simplified and/or improved
Use your knowledge and mastery of the project to mature the proposed solution. The first proposed solution will rarely be the best, but with discussion and feedback you can reach a more robust solution.
In phases 1 and 2 you'll spend more time, but it's essential to ensure the proposed solution is viable and robust. A bad solution can lead to serious problems in the future. If your understanding of the project is limited, AI can suggest solutions that don't meet project needs. So try your best to understand business rules and technical limitations of the project, this way you can guide AI to reach a viable solution.
If you already have a solution in mind, don't hesitate to share. But remember AI can suggest better alternatives, so don't rush to implement. The most important thing in these first two phases is to reach correct understanding about the problem and proposed solution. Because prompts, templates, rules or any other technique won't help when the initial context was built incorrectly.
In case of new discoveries about fundamentals, business rules or technical limitations, discuss with the Agent and update the project overview. Proceed to phase 3 when you're 100% satisfied with the proposed solution.
Before moving to a full specification, consider producing a short design summary: a concise document (1-2 pages) that captures the current state, the desired end state, the patterns to follow, resolved decisions, and any open questions. This is cheaper to review and correct than a full spec, and it forces the model to surface its assumptions before you invest time in detailed planning. If you're working with a team, this is also the right artifact to share for early alignment, since catching a wrong direction in a short summary saves everyone the pain of reworking a detailed spec. Save it alongside your specs in .context/projects/<project>/specs as a lightweight reference.
Objective: Transform discussion into professional document
Now that you understand the problem and proposed solution, you can create a planning document and/or specification describing what will be implemented. I usually use planning documents for larger projects involving multiple modules or functionalities, and specifications for smaller projects involving just one module or functionality. I also create specifications based on planning documents for larger projects. This is up to you, what's important is having a document detailing everything discussed in previous phases, and preparing tasks granularly so they can be executed by the Agent.
Planning documents and specifications should be saved in .context/projects/<project>/specs folder.
Instructions for the Agent
- Request structured specification based on previous discussions
- Iterate until professional - no emojis, clear, objective, with clear decisions, no redundancy
- Always include: objective, requirements, assumptions, limitations, constraints, tasks, test cases, granular tasks, obvious caveats and trade-offs
- Save in
.context/projects/<project>/specsfolder
Read and fully understand specification. It needs to make sense to you. The objective is for it to be clear and understandable for a junior programmer starting on the project to implement tasks. If you don't understand something, ask, request examples or help. Often you'll need to validate business rules with your team, then continue interaction with model to refine specification.
If you made new discoveries, discuss with Agent and update plan or specification if necessary. Proceed to phase 4 when you're 100% satisfied with the proposal.
Specification Template
Here's a simplified version of the template I use to create specifications:
# [Feature/Bug Fix Name]

## Problem
[Clear description of problem or need]

## Context
[Relevant information about project, architecture, limitations]

## Proposed Solution
[Description of chosen approach and justification]

## Affected Files
- `path/file1.js` - [what will be changed]
- `path/file2.js` - [what will be changed]

## Implementation Tasks
- [ ] Task 1: [specific and granular description]
- [ ] Task 2: [specific and granular description]
- [ ] Task 3: [specific and granular description]

## Test Cases
- [ ] Test 1: [success scenario]
- [ ] Test 2: [error scenario]
- [ ] Test 3: [important edge case]

## Constraints and Trade-offs
- [Technical limitation or design decision]
- [Important trade-off to consider]Tip: Keep tasks granular. Each task should be self-contained enough for Agent to execute it without additional context.
Structure tasks as incremental slices, not layers. A common trap is organizing tasks by technical layer: "first do all the database changes, then all the service logic, then all the API endpoints, then all the frontend." This feels tidy but means nothing is testable until the very last task is done. If something breaks, you're debugging across the entire stack at once.
Instead, structure each task as a thin end-to-end slice that can be verified independently. For example: "add the endpoint with a mock response, wire it to the frontend, then replace the mock with real service logic." Each slice produces something you can run, test, and confirm before moving on. This gives you natural checkpoints where you can catch problems early, rather than discovering at the end that a fundamental assumption was wrong three tasks ago.
Objective: Implement tasks detailed in specification with safety and quality
- Present final specification to Agent in Chat mode
- Request it to map change points before starting implementation
- Validate approach through discussion - Chat Mode doesn't make changes, only analyzes and discusses
- When satisfied, switch to Code mode to start implementation
- Instruct Agent to implement one task at a time and minimize scope of changes
- Review each change before continuing
- Validate functionality at each checkpoint and if application is in consistent state, commit the change to record successfully completed modification
Why Chat Mode first?
- Chat Mode: Discussion, analysis and approach validation without modifying code
- Code Mode: Implementation with direct access to project files
- Benefit: Avoids hasty changes and ensures approach is correct before modifying code
Implementation rules:
- Be specific: "Change only function X in file Y"
- One thing at a time: Don't mix functionalities
- Always validate: Test each change immediately
- Document decisions: Update context with important changes
- You are the bottleneck, by design: Resist the urge to queue up multiple tasks for the agent while the previous one is still unreviewed. The speed of generation is not the constraint; your ability to understand and verify the output is. Treat that as a feature, not a limitation
Proceed to phase 5 to validate implementation. You'll probably do several iterations between phases 4 and 5 to ensure implementation is working correctly.
When things go wrong: If an implementation produces unexpected results or breaks existing functionality, don't keep prompting the agent to fix it in the same session. The context is already polluted with the failed approach. Instead: (1) revert the broken changes (git stash or git checkout), (2) start a fresh conversation, (3) load the spec and describe what went wrong and why, (4) discuss a different approach before trying again. Spending two more hours in a broken session is almost always worse than spending ten minutes resetting.
Objective: Ensure implementation is working correctly and application is in consistent state
- Create tests based on existing ones (patterns)
- Test basic cases for success and error
- Include edge cases and boundary conditions
- Validate integration with rest of system
- Document coverage in specification
- Validate functionality at each checkpoint and if application is in consistent state, request Agent to run tests and proceed only when tests pass
Caution: agent-written tests can be circular. When the agent writes both the implementation and the tests, there's a risk that the tests are designed to confirm what the code does rather than to verify what the code should do. The agent may write assertions that pass by construction, mirroring the implementation's behavior rather than independently verifying the requirement. Review test assertions independently from the implementation: ask yourself "does this test verify the intended behavior, or does it just confirm the code does what it does?" Pay special attention to weakened assertions (toEqual instead of toStrictEqual), overly permissive matchers, and tests that mock away the exact behavior they should be testing.
Whenever it fails, understand why, discuss with Agent and find solution, validate solution and then update specification if necessary.
- Never trust 100% - LLMs can and will hallucinate
- Always validate - Test everything before continuing (Agent itself can run tests for you at each checkpoint)
- Context is king - Balanced Context Window Size, better results (keep context token count below 50% of model limit)
- Small granularity - Small changes = fewer errors
- Document everything - Context folder is your external memory
- Experience amplifies results: The more you understand about architecture, trade-offs, and code quality, the better you can evaluate AI output. AI multiplies whatever judgment you bring to it
- Accelerates learning at all levels: For developers still building their repertoire, the method provides structure that compensates for less experience. The discipline of verifying every output, questioning alternatives, and writing specs builds engineering instincts faster than working alone
- Positive cost-benefit: Investment in tools vs time gained. You spend money to pay for tokens, but you're actually buying time
- Superior quality: Constant review + rigorous validation
Context Management
- Context Engineering >> Prompt Engineering: keep tokens below 50% of model limit
- Start new conversations after planning phase to keep context under control
- Excellent prompts are nothing without excellent context
- The higher the detail level, more chance of partial or truncated responses
Quality and Validation
- Use tests to validate each change
- Make commits in stable states
- Allow progress upon approval
- Monitor infinite loops: models can do/undo the same change repeatedly
Specifications and Documentation
- Write specs for junior developers: granular tasks with checkboxes
- Informing output format helps model better understand what you expect
- Provide visual context and examples for inspiration (especially for UIs)
Optimization and Costs
- Use open source models for simpler tasks (cost savings)
- Use MCPs to give more power to models when appropriate
- Open questions with little context are good for exploring model "creativity"
Now that you know the method, here's a practical plan to start today:
Initial Setup
- Choose your tool (Windsurf, Cursor or Continue.dev)
- Create basic
.context/folder structure in your project - Configure basic rules (your team's code patterns)
First Simple Task
- Choose a small bug or simple feature
- Apply Phases 1-2 (Research + Brainstorm)
- Create your first specification using the simplified template
- Implement following Phases 4-5
Reflection and Adjustments
- Document what worked and what didn't
- Adjust your templates and rules based on experience
- Identify patterns you can reuse
Objectives:
- Apply the method to 2-3 tasks per week
- Refine your templates based on real use
- Start documenting important decisions in
.context/folder - Measure your productivity (time before vs after)
- Start with simple tasks to understand how the process works and to refine the method and templates as needed
- Avoid complex tasks at the beginning
Progress Signs:
- ✅ You're spending 60-70% of time on planning (Research + Brainstorm + Plan)
- ✅ Implementation is getting faster with fewer bugs
- ✅ You're reusing specifications and patterns
- ✅
.context/folder is growing with useful documentation - ✅ Feel you recover flow state faster after switching between tasks
- ✅ You feel you're evolving and adapting better to using AI
- ✅ Feel productivity is increasing
- ✅ Notice your main focus is thinking more about the task and not typing
Start small, but start. Don't wait to have perfect setup. Choose a simple task tomorrow and apply only Phases 1-2 (Research + Brainstorm). You'll learn more by doing than by reading.
Remember: the goal isn't perfection, it's consistent progress. Each iteration will teach you something new about how to work better with AI.