- ASUS G14 stores its UEFI (BIOS) settings in its 16MiB SPI Flash ROM (NVRAM region).
- The NVRAM region can be cleared by:
- Dumping the flash ROM contents with
flashprog(using an opensensor/pico-serprog or dword1511/stm32-vserprog flash programmer). - In the ROM dump, replacing the NVRAM region with the clean state from an EZFlash update file using
UEFIToolandUEFIToolNE. - Writing the modified NVRAM region back into the Flash ROM.
- Dumping the flash ROM contents with
I accidentally bricked my ASUS Zephyrus G14 GA401 (2021) Laptop while playing with Smokeless_UMAF, and it stuck on power-on even without the ROG Logo appearing. Since traditional "CMOS clear" methods (such as long-pressing the power button, cutting off the battery pack for a while, or pressing Ctrl + Home to launch EZFlash) didn't work for me, I had to dump the contents of the Flash ROM chip and write the modified contents back into the chip.
Thanks to open-source tools for handling SPI Flash ROM and UEFI files, I successfully unbricked my laptop. This is primarily a memo for myself. Attempting this procedure is at your own risk.
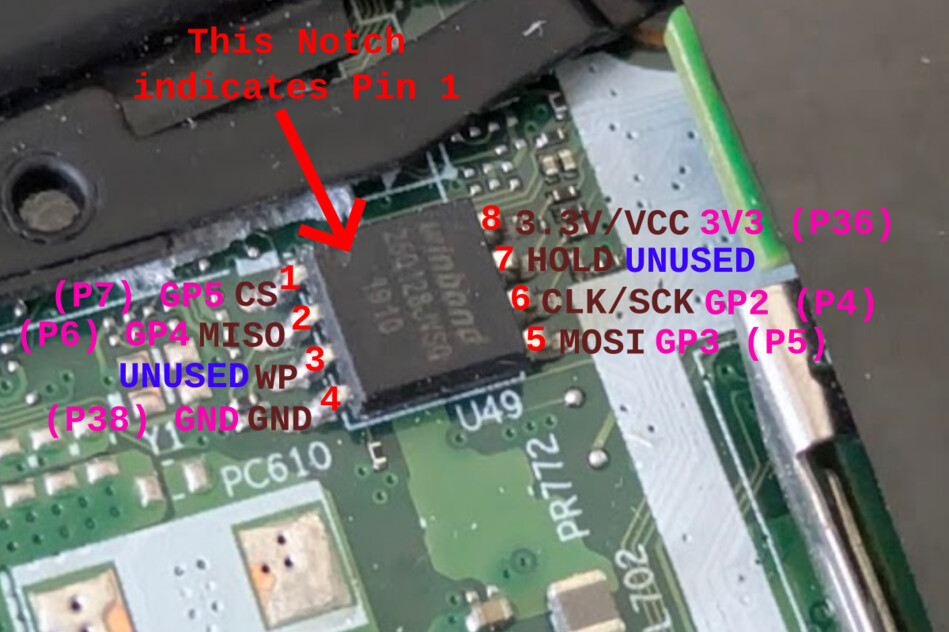
- On my laptop, the SPI Flash ROM (Winbond W74M12JWSIQ, 128Mbit, @1.8V) is located between the M.2 NVME socket and the battery.
- I directly soldered some wires onto the pins: CS, MISO, GND, MOSI, CLK, VCC.
- As a flash programmer, I tried the following, and both worked:
- An RP2040 RPi Pico with opensensor/pico-serprog firmware.
- An STM32F103 Blue Pill with dword1511/stm32-vserprog firmware.
- Also, I used a cheap 3.3V/1.8V level shifter found on my desk, but it turned out to cause read inconsistency (random bit rot), so I just put a 1k/1k voltage divider on CLK and connected MISO directly.
- These serprog-compatible programmers can be controlled by
flashromor its fork from the Libreboot team,flashprog.flashromcan be installed using apt-get, whileflashprogcannot. However,flashprogis seemingly more feature-rich (e.g., supports the--progressflag, etc.).- I used
flashprogvia anarchilinuxDocker container. - References:

The following is cited from the Libreboot docs. Note in this case VCC is 1.8V.
- Using an RP2040 RPi Pico with opensensor/pico-serprog firmware.
- The prebuilt binary can be found at Release v1.0.0 · opensensor/pico-serprog. Download the
.uf2file, power the board while pressing the BOOT button, then copy the file to theRPI-RP2drive. - The pinouts are:
- GP2: SCK
- GP3: MOSI
- GP4: MISO
- GP5: CS

- Using an STM32F103 Blue Pill with dword1511/stm32-vserprog firmware.
- No prebuilt binary is available, but a detailed guide can be found in the README.
- Put it in ISP mode by configuring the on-board jumpers as BOOT0=1 and BOOT1=0. Connect PA9 (TX) and PA10 (RX) to a USB Serial adapter. After flashing, make sure BOOT0=0.
- The pinouts are: (ref: Pull Request #7 · dword1511/stm32-vserprog)
- PA6: MISO
- PA7: MOSI
- PA4: CS
- PA5: SCK
$ git clone --recurse-submodules https://github.com/dword1511/stm32-vserprog.git
$ cd stm32-vserprog
$ git log | head -1
commit c74b4ed5704907f56e6ed1fa59d1874fd8de1bda

$ sudo apt-get install -y stm32flash gcc-arm-none-eabi

$ make BOARD=stm32-bluepill
$ sudo make BOARD=stm32-bluepill flash-uart
- First, dump the current Flash ROM contents.
# Start archilinux container. Here ttyACM1 is the flasher, identified from `ls -hl /dev/serial/by-id`
$ docker run --rm -it -v $PWD:/wd -w /wd --device /dev/ttyACM1 archlinux:latest bash

# Install flashprog
$ pacman -Sy flashprog
$ flashprog -V
flashprog v1.4-dirty on Linux 6.8.0-55-generic (x86_64)
flashprog is free software, get the source code at https://flashprog.org
...

# Read and determine the flash
$ flashprog --progress -p serprog:dev=/dev/ttyACM1,spispeed=2M -r g14-bios.flashprog.bin
flashprog v1.4-dirty on Linux 6.8.0-55-generic (x86_64)
flashprog is free software, get the source code at https://flashprog.org

Using clock_gettime for delay loops (clk_id: 1, resolution: 1ns).
serprog: Programmer name is "pico-serprog"
Warning: NAK to query operation buffer size
Found Winbond flash chip "W25Q128.W" (16384 kB, SPI) on serprog.
...
Reading... [==================================================] 100% done.

# Verify the dump
$ flashprog -V --progress -c W25Q128.W -p serprog:dev=/dev/ttyACM1,spispeed=2M -v g14-bios.flashprog.bin
...
Reading... [==================================================] 100% VERIFIED.- Obtain a BIOS update file (a zip archive for EZFlash) from the ASUS website.
$ unzip GA401QCAS415.zip
inflating: GA401QCAS.415- Download UEFITool NE binary.
- Download UEFI Tool binary.
- https://github.com/LongSoft/UEFITool/releases/tag/0.28.0
- UEFITool NE is a successor, but it does not support editing yet. Therefore, I used UEFITool NE for analyzing and extracting the NVRAM file, and then used UEFI Tool to modify the dump file.
- Open the BIOS update file with
UEFI Tool NE.- Expand
AMI Aptio capsule > UEFI image > AmiStandardDefaultsVariable > NVRAM. - Right click on
NVRAMandExtract as isto save.ffsfile. - Note the File GUID for NVRAM (e.g.
CEF5B9A3-...) 
- Expand
- Open the dump file with
UEFI Tool.- Expand
UEFI image > <First Volume UUID>. Right-click the file with the same UUID (matching the NVRAM File GUID noted earlier). - Right-click on
CEF5B9A3-(or the corresponding UUID) andReplace as is. Load the.ffsfile that you extracted from the BIOS update file. - Save the modified file by selecting
File > Save image file. (g14-bios.flashprog.replaced.bin) 
- Expand
- Now write the modified version to the ROM.
# Create a layout file to avoid full-flash.
# The content length is guessed from the layout from UEFITool NE.
$ vi flash.layout
$ cat flash.layout
00000000:0001ffff nvram
00020000:00ffffff other

# Write nvram region.
$ flashprog -V -c W25Q128.W --layout flash.layout --image nvram --progress -p serprog:dev=/dev/ttyACM1,spispeed=2M -w g14-bios.flashprog.replaced.bin
...
Using region: "nvram".
Reading old flash chip contents...
Reading... [==================================================] 100% done.
Erasing and writing flash chip...
Erasing... [==================================================] 100% , 0x010000-0x01ffff:E
0x000000-0x01ffff:
Writing... [==================================================] 100% W
Erase/write done.
Verifying flash...
Reading... [==================================================] 100% VERIFIED.- DONE. Remove the flasher and power the laptop. Fingers crossed.