- Raspberry Pi
- MicroUSB Power Adapter
- MicroSD Card
- GPS with TTL serial NMEA and 1Hz PPS output
- Jumper Wires
Notes:
- I prefer the Raspberry Pi Zero 2 W with Headers for this project
- You will also need to be able to read an write to the MicroSD card on another system to flash the OS
- You may need to solder header pins onto the GPS
The fine folks at the Raspberry Pi Foundation have already created a bunch of documentation on how to install Raspberry Pi OS onto a MicroSD card. Check out the following link and follow their installation instructions noting the pre-configuration options below that will need to be set:
Make sure to pre-configure the following during the installation process:
- Username
- Password
- Hostname
- WiFi
- Enable SSH
- Insert the MicroSD card with the Raspberry Pi OS image into the MicroSD slot on the Raspberry Pi Zero 2 W
- Connect the MicroUSB power supply
The Raspberry Pi should connect to the WiFi network that you pre-configured. It will receive an IP address via DHCP once connected. You will need to interrogate the DHCP server to determine the IP address provided to the device with the hostname that you pre-configured in the Raspberry Pi OS installation.
- At the command prompt, type
ssh pi@<ip address of your Raspberry Pi> - You should be asked for the password you provided during the Raspberry Pi OS installation.
- Once you enter the password, you should see a command prompt similar to the following:
pi@time:~ $
At the command prompt, type sudo nano /boot/firmware/config.txt
In the [all] section at the end of the file, add the following lines:
enable_uart=1
dtoverlay=pps-gpio,gpiopin=18
When finished, it should look similar to the following:
# For more options and information see
# http://rptl.io/configtxt
# Some settings may impact device functionality. See link above for details

# Uncomment some or all of these to enable the optional hardware interfaces
#dtparam=i2c_arm=on
#dtparam=i2s=on
#dtparam=spi=on

# Enable audio (loads snd_bcm2835)
# dtparam=audio=on

# Additional overlays and parameters are documented
# /boot/firmware/overlays/README

# Automatically load overlays for detected cameras
# camera_auto_detect=1

# Automatically load overlays for detected DSI displays
# display_auto_detect=1

# Automatically load initramfs files, if found
auto_initramfs=1

# Enable DRM VC4 V3D driver
dtoverlay=vc4-kms-v3d
max_framebuffers=2

# Don't have the firmware create an initial video= setting in cmdline.txt.
# Use the kernel's default instead.
disable_fw_kms_setup=1

# Run in 64-bit mode
arm_64bit=1

# Disable compensation for displays with overscan
# disable_overscan=1

# Run as fast as firmware / board allows
arm_boost=1

[cm4]
# Enable host mode on the 2711 built-in XHCI USB controller.
# This line should be removed if the legacy DWC2 controller is required
# (e.g. for USB device mode) or if USB support is not required.
# otg_mode=1

[cm5]
# dtoverlay=dwc2,dr_mode=host

[all]
enable_uart=1
dtoverlay=pps-gpio,gpiopin=18
At the command prompt, type sudo nano /boot/firmware/cmdline.txt
Remove the following:
console=serial0,115200
When finished, it should look as follows:
console=tty1 root=PARTUUID=87117695-02 rootfstype=ext4 fsck.repair=yes rootwait cfg80211.ieee80211_regdom=US
At the command prompt, type sudo nano /etc/modules
Add the following line:
pps-gpio
When finished, it should look similar to the following:
# /etc/modules: kernel modules to load at boot time.
#
# This file contains the names of kernel modules that should be loaded
# at boot time, one per line. Lines beginning with "#" are ignored.
# Parameters can be specified after the module name.

pps-gpi
Reboot the system:
At the command prompt, type sudo reboot
At the command prompt, type sudo nmcli c modify "preconfigured" ipv4.addresses "192.168.0.3/24"
This change takes efect immediately. If you are connected to the system via network, you may need to reconnect on the new IP address.
Raspberry Pi General Purpose Input Output (GPIO) Pinout
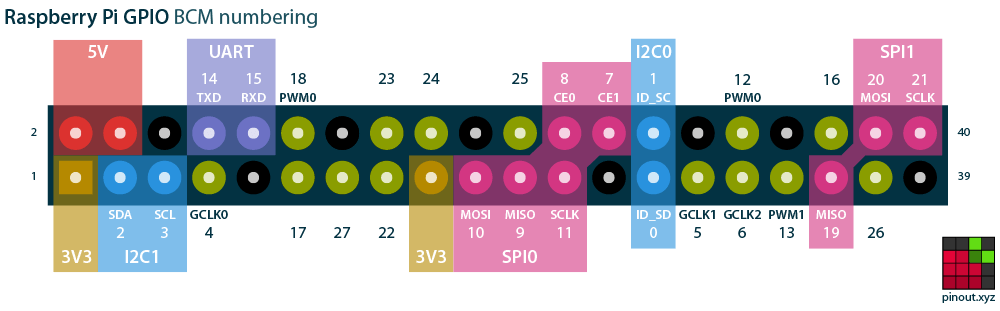
Connecting the GPS to the Raspberry Pi is pretty straightforward:
| GPS | Raspberry Pi Pin | Raspberry Pi Signal |
|---|---|---|
| PPS | 12 | GPIO 18 |
| VIN | 4 | 5V |
| GND | 6 | GND |
| RX | 8 | UART TXD |
| TX | 10 | UART RXD |
At the command prompt, type gpsmon --nocurses /dev/ttyS0
The output should look similar to the following:
gpsmon: time:/dev/ttyS0 9600 8N1
(84) $GPGGA,015638.000,3956.3013,N,10502.8197,W,2,08,1.12,1620.8,M,-20.9,M,0000,0000*6C
(58) $GPGSA,A,3,31,32,01,25,10,28,02,03,,,,,1.43,1.12,0.89*08
(70) $GPRMC,015638.000,A,3956.3013,N,10502.8197,W,0.08,8.98,040625,,,D*7D
(37) $GPVTG,8.98,T,,M,0.08,N,0.15,K,D*3D
(84) $GPGGA,015639.000,3956.3014,N,10502.8197,W,2,08,1.23,1620.8,M,-20.9,M,0000,0000*68
(58) $GPGSA,A,3,31,32,01,25,10,28,02,03,,,,,2.27,1.23,1.91*03
(70) $GPRMC,015639.000,A,3956.3014,N,10502.8197,W,0.11,8.98,040625,,,D*73
(37) $GPVTG,8.98,T,,M,0.11,N,0.21,K,D*32
(84) $GPGGA,015640.000,3956.3014,N,10502.8197,W,2,08,1.12,1620.8,M,-20.9,M,0000,0000*64
(58) $GPGSA,A,3,31,32,01,25,10,28,02,03,,,,,1.43,1.12,0.89*08
(70) $GPRMC,015640.000,A,3956.3014,N,10502.8197,W,0.13,8.98,040625,,,D*7F
(37) $GPVTG,8.98,T,,M,0.13,N,0.25,K,D*34
Press CTRL-C to stop the test.
At the command prompt, type ppstest /dev/pps0
The output should look similar to the following:
trying PPS source "/dev/pps0"
found PPS source "/dev/pps0"
ok, found 1 source(s), now start fetching data...
source 0 - assert 1748696194.448467356, sequence: 1741 - clear  0.000000000, sequence: 0
source 0 - assert 1748696195.448470325, sequence: 1742 - clear  0.000000000, sequence: 0
source 0 - assert 1748696196.448474439, sequence: 1743 - clear  0.000000000, sequence: 0
source 0 - assert 1748696197.448476314, sequence: 1744 - clear  0.000000000, sequence: 0
source 0 - assert 1748696198.448481522, sequence: 1745 - clear  0.000000000, sequence: 0
source 0 - assert 1748696199.448485479, sequence: 1746 - clear  0.000000000, sequence: 0
source 0 - assert 1748696200.448487875, sequence: 1747 - clear  0.000000000, sequence: 0
source 0 - assert 1748696201.448491625, sequence: 1748 - clear  0.000000000, sequence: 0
Press CTRL-C to stop the test.
At the command prompt, type sudo apt install gpsd -y
At the command prompt, type sudo nano /etc/default/gpsd
Modify the file to include only the following lines:
DEVICES="/dev/ttyS0 /dev/pps0"
GPSD_OPTIONS="-n -r -b -G"
What do these options do?
From gpsd --help:
  Options include:
  -?, -h, --help            = help message
  -b, --readonly            = bluetooth-safe: open data sources read-only
  -D, --debug integer       = set debug level, default 0
  -F, --sockfile sockfile   = specify control socket location, default none
  -f, --framing FRAMING     = fix device framing to FRAMING (8N1, 8O1, etc.)
  -G, --listenany           = make gpsd listen on INADDR_ANY
  -l, --drivers             = list compiled in drivers, and exit.
  -n, --nowait              = don't wait for client connects to poll GPS
  -N, --foreground          = don't go into background
  -P, --pidfile pidfile     = set file to record process ID
  -p, --passive             = do not reconfigure the receiver automatically
  -r, --badtime             = use GPS time even if no fix
  -S, --port PORT           = set port for daemon, default 2947
  -s, --speed SPEED         = fix device speed to SPEED, default none
  -V, --version             = emit version and exit.
When finished, it should look similar to the following:
# Devices gpsd should collect to at boot time.
# They need to be read/writeable, either by user gpsd or the group dialout.
DEVICES="/dev/ttyS0 /dev/pps0"

# Other options you want to pass to gpsd
GPSD_OPTIONS="-n -r -b --listenany"
At the command prompt, type sudo systemctl restart gpsd
At the command prompt, type gpsmon --nocurses
The output should look similar to the following:
gpsmon: tcp://localhost:2947
(82) {"class":"VERSION","release":"3.22","rev":"3.22","proto_major":3,"proto_minor":14}
(292) {"class":"DEVICES","devices":[{"class":"DEVICE","path":"/dev/ttyS0","driver":"NMEA0183","activated":"2025-05-31T13:10:40.106Z","flags":1,"native":0,"bps":9600,"parity":"N","stopbits":1,"cycle":1.00},{"class":"DEVICE","path":"/dev/pps0","driver":"PPS","activated":"2025-05-31T13:10:40.451Z"}]}
(122) {"class":"WATCH","enable":true,"json":false,"nmea":false,"raw":2,"scaled":false,"timing":false,"split24":false,"pps":true}
TOFF= 1748697040.939376513 real= 1749002443.000000000
(84) $GPGGA,020043.000,3956.3091,N,10502.8191,W,2,08,1.13,1623.5,M,-20.9,M,0000,0000*63
(58) $GPGSA,A,3,31,32,01,25,10,28,02,03,,,,,1.44,1.13,0.89*0E
(72) $GPRMC,020043.000,A,3956.3091,N,10502.8191,W,0.32,221.37,040625,,,D*78
(39) $GPVTG,221.37,T,,M,0.32,N,0.60,K,D*3A
PPS= 1748697041.45133135 clock= 1749002444.00000000 offset=-305402.548668644
------------------- PPS offset: -305402.548668644 ------
TOFF= 1748697041.968524741 real= 1749002444.000000000
(84) $GPGGA,020044.000,3956.3090,N,10502.8191,W,2,08,1.13,1623.5,M,-20.9,M,0000,0000*65
(58) $GPGSA,A,3,31,32,01,25,10,28,02,03,,,,,1.44,1.13,0.89*0E
(72) $GPRMC,020044.000,A,3956.3090,N,10502.8191,W,0.36,221.37,040625,,,D*7A
(39) $GPVTG,221.37,T,,M,0.36,N,0.67,K,D*39
PPS= 1748697042.45133437 clock= 1749002445.00000000 offset=-305402.548665623
------------------- PPS offset: -305402.548665623 ------
TOFF= 1748697042.970956095 real= 1749002445.000000000
(84) $GPGGA,020045.000,3956.3089,N,10502.8191,W,2,08,1.13,1623.5,M,-20.9,M,0000,0000*6C
Press CTRL-C to stop the test.
You can also use the CLI GPS application to test GPS communication
At the command prompt, type cgps -s
The output should look similar to the following:
┌─ssssssssssssssssssssssssssssssssssssssssss┐┌─aaaaaaaaaaaaaaaaaSeen 12/Used  8┐
│ Time:        2025-06-04T02:16:13.000Z (0) ││GNSS   PRN  Elev   Azim   SNR Use│
│ Latitude:         39.93839167 N           ││GP  1    1  40.0  292.0  27.0  Y │
│ Longitude:       105.04698667 W           ││GP  2    2  43.0  252.0  31.0  Y │
│ Alt (HAE, MSL):   1606.700,   1627.600 m  ││GP  3    3  23.0  311.0  17.0  Y │
│ Speed:             0.44 km/h              ││GP 10   10  34.0  122.0  18.0  Y │
│ Track (true, var):   189.0,   8.1     deg ││GP 25   25  21.0   71.0  18.0  Y │
│ Climb:             0.00 m/min             ││GP 28   28  77.0  109.0  34.0  Y │
│ Status:         3D DGPS FIX (82 secs)     ││GP 31   31  58.0  189.0  27.0  Y │
│ Long Err  (XDOP, EPX):  0.58, +/-  2.2 m  ││GP 32   32  49.0   55.0  22.0  Y │
│ Lat Err   (YDOP, EPY):  1.07, +/-  4.0 m  ││GP  4    4   1.0  261.0   0.0  N │
│ Alt Err   (VDOP, EPV):  0.90, +/-  5.2 m  ││GP 12   12   7.0   41.0  18.0  N │
│ 2D Err    (HDOP, CEP):  1.11, +/-  5.3 m  ││GP 26   26   8.0  164.0  16.0  N │
│ 3D Err    (PDOP, SEP):  1.43, +/-  6.8 m  ││SB135   48  39.0  209.0  31.0  N │
│ Time Err  (TDOP):       1.41              ││                                 │
│ Geo Err   (GDOP):       2.78              ││                                 │
│ ECEF X, VX:              n/a    n/a       ││                                 │
│ ECEF Y, VY:              n/a    n/a       ││                                 │
│ ECEF Z, VZ:              n/a    n/a       ││                                 │
│ Speed Err (EPS):       +/- 29.0 km/h      ││                                 │
│ Track Err (EPD):        n/a               ││                                 │
│ Time offset:           -305412.866757769 s││                                 │
│ Grid Square:            DM79lw45          ││                                 │
└─aaaaaaaaaaaaaaaaaaaaaaaaaaaaaaaaaaaaaaaaaa┘└─eeeeeeeeeeeeeeeeeeeeeeeeeeeeeeee┘
Press CTRL-C to exit the test.
At the command prompt, type sudo apt install ntp -y
At the command prompt, type sudo nano /etc/ntpsec/ntp.conf
Ensure these options are set:
# /etc/ntpsec/ntp.conf, configuration for ntpd; see ntp.conf(5) for help

driftfile /var/lib/ntpsec/ntp.drift
leapfile /usr/share/zoneinfo/leap-seconds.list
tos maxclock 7

server 127.127.28.0 minpoll 4
fudge 127.127.28.0 refid GPS

server 127.127.28.1 minpoll 4 prefer
fudge 127.127.28.1 refid PPS

restrict default kod nomodify nopeer noquery limited
restrict 127.0.0.1
restrict ::1
restrict 192.168.0.0/24
At the command prompt, type sudo systemctl restart ntp
At the command prompt, type ntpmon 127.0.0.1
The output should look similar to the following:
     remote           refid      st t when poll reach   delay   offset   jitter
*SHM(0)          .GPS.            0 l    -   16  377   0.0000  -2.3443  21.1453
 SHM(1)          .PPS.            0 l    -   16    0   0.0000   0.0000   0.0010
ntpd ntpsec-1.2.2                              Updated: 2025-06-04T07:51:01 (8)
 lstint avgint rstr r m v  count    score   drop rport remote address
      0   1463    0 . 6 2     22    0.450      0 53543 localhost
Press CTRL-C to exit the test.
At the command prompt, type sudo nano /etc/systemd/timesyncd.conf
Modify the NTP line as follows:
[Time]
NTP=127.0.0.1
Reboot the system:
At the command prompt, type sudo reboot
Nice write-up! I followed it but with slightly different hardware and it totally worked! Also I added an optional step 21. You just add this line to the end of
/etc/ntpsec/ntp.conf:# Uncomment if you want to provide time to your local subnet broadcast 10.10.15.255