Flashing Marlin to a Monoprice Maker Select V2
These notes were written March 2020, and may be out of date. I'm flashing Marlin 2.0.4.4 using a Bus Pirate from macOS Catalina.
Support for the Monoprice Maker Select V2, aka Wanhao Duplicator i3 V2.1, has been merged into Marlin, so you should not need to find any third-party code or mysterious config files posted to Reddit years ago.
Install prerequisites:
brew install avrdude platformio
Disconnect power from the printer and remove the screws on the bottom and rear of the control box. Note that there are four longer screws arranged in an inset rectangle on the bottom, which attach the power supply to the enclosure. I stongly recommend trying to avoid unfastening these.
The Melzi controller board is mounted to the inside top of the box, oriented so that the AVR programming pins are towards the front. (Ever wonder why the microSD card slot is upside down?) Sliding the power supply out about half way should give you plenty of access.
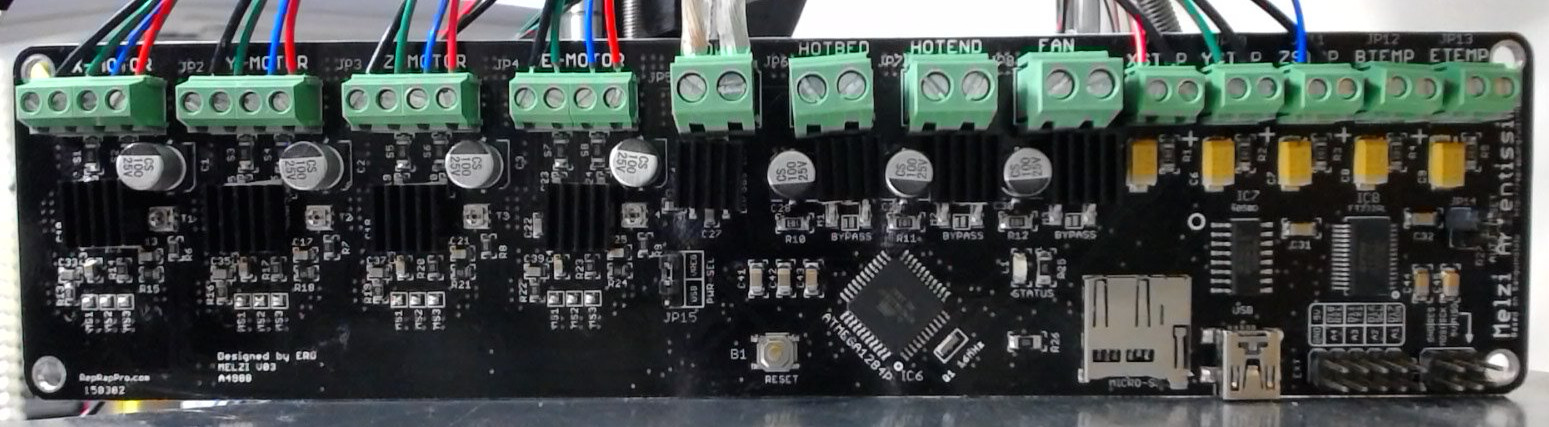
In the photo above, the AVR In-Circuit Programming (ISP) pins are the bottom-rightmost group of six. Connect them to the Bus Pirate according to the documentation. It helps to find a color-coded chart if using a cable; here's the one for mine.
(There's no need to use a Bus Pirate specifically; it should be possible to use an Arduino or Raspberry Pi instead, but that is outside the scope of this write up.)
Connect the Bus Pirate to the Mac via USB. Once connected, we can initiate a backup of the existing firmware. Here, /dev/cu.usbserial-A105BMH4 is the serial device that shows up when the Bus Pirate is connected.
avrdude -c buspirate -P /dev/cu.usbserial-A105BMH4 -p atmega1284p -U flash:r:backup.bin:r
This produces backup.bin which can be restored back to the device if something goes wrong. It takes a while, over 1 hour.
Attempting to initiate BusPirate binary mode...
avrdude: Paged flash write enabled.
avrdude: AVR device initialized and ready to accept instructions

Reading | ################################################## | 100% 0.08s

avrdude: Device signature = 0x1e9705 (probably m1284p)
avrdude: reading flash memory:

Reading | #########################################          | 82% 3448.82s
Next we flash the Optiboot bootloader. This isn't strictly necessary but it will make flashing future versions of Marlin easier, because we will be able to do so over the USB port on the side of the control box.
curl -OL https://raw.githubusercontent.com/Lauszus/Sanguino/master/bootloaders/optiboot/optiboot_atmega1284p.hex
avrdude -c buspirate -P /dev/cu.usbserial-A105BMH4 -p atmega1284p -U flash:w:optiboot_atmega1284p.hex:i
At this point the Bus Pirate should be disconnected from USB, though it may be wise to keep the jump wire connected to the pins until finished.
We will now build Marlin for the Maker Select V2.
Download the Marlin source code. In the config/README.md file you will find where to download the corresponding configurations. From the configurations archive, copy all of the .h files in config/examples/Wanhao/Duplicator i3 2.1/ into the Marlin/ directory of the Marlin archive (next to Version.h).
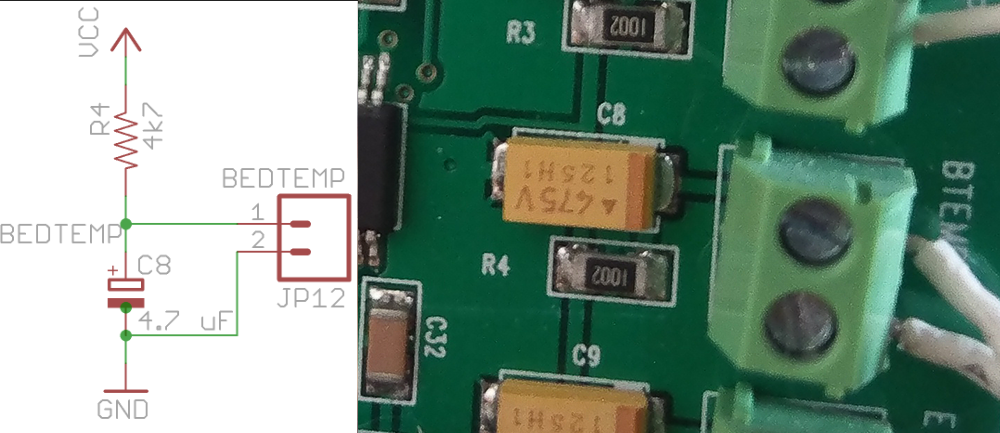
Take a close look at the BTEMP (bed temperature sensor) and ETEMP (extruder temperature sensor) terminal blocks on the Melzi board. Just below them are resistors R4 and R5, respectively, as seen in this photo from @ellensp:
Edit the Marlin/Configuration.h file and find the temperature sensor type definitions:
#define TEMP_SENSOR_0 99
#define TEMP_SENSOR_1 0
#define TEMP_SENSOR_2 0
#define TEMP_SENSOR_3 0
#define TEMP_SENSOR_4 0
#define TEMP_SENSOR_5 0
#define TEMP_SENSOR_6 0
#define TEMP_SENSOR_7 0
#define TEMP_SENSOR_BED 99
If the R4 resistor is labeled 472, then change the value for TEMP_SENSOR_0 to 11. Similarly for R5 and TEMP_SENSOR_BED.
Save any modifications and build Marlin (from within the top level directory):
platformio run -e sanguino_atmega1284p
Locate the power select jumper on the Melzi board, near the center, labeled JP15 and PWR-SEL. Move the jumper to the USB setting to allow us to power up the board via USB, which we can now do. The display backlight should turn on as soon as USB is connected.
Now we can upload Marlin:
platformio run -e sanguino_atmega1284p -t upload
When finished, the Marlin logo should appear on the display. It likely will also say Err: EEPROM Version, which means we need to reset the configuration stored in EEPROM. We can do this from the UI, under Configuration > Advanced Settings > Initialize EEPROM > Init, then Configuration > Restore Defaults. There is no feedback when this happens, until you power cycle the device.
As a bonus, we can open Ultimaker Cura and switch over to the Monitor tab and see that it is now capable of communicating with the printer over USB!
Wrapping up, USB can be disconnected, the power select jumper moved back to its original setting, and the control box reassembled.