Here is a brief tutorial on how to open your Ubuntu files like any other Windows folder. The way we'll achieve this is by adding a Host-Only network adapter.
I'm not an expert.
I am not an expert in networking and can barely fix anything. Don't quote me on this.
A computer network is just like a dorm. Each computer has an address (how to find them). In order to avoid 2 computers having the same address, a protocol called DHCP is used to "give" address to a computer joining a network. Think of it as moving into a dorm and the dorm supervisor assigns you a room number.
DHCP is not the dorm supervisor, it's just a way for them to give you the room number - something like the front desk.
- IP address is the address of the computer. It is usually written as
xxx.xxx.xxx.xxx. Think of it as your room number, let's saysection 2 room 2. - Subnet mask is a mask that tells the computer which part of an IP address belongs to you and to the router.
This is usually
255.255.255.0in simple networks so don't worry about it. - The gateway is the address of the router. Think of it as the room number of the dorm supervisor.
When your computer wants to send something to another computer, it does this:
- your computer tries to find the receiver address on the network. If it finds it, it sends the data directly to the receiver.
- if your computer cannot find any matching address locally, it will send it to gateway, and gateway will be responsible for relaying the data to the receiver.
Adding a Host-Only Network Adapter to an existing VM.
Open VMWare Workstation (or Player, it should be fine). Click on "Edit virtual machine settings".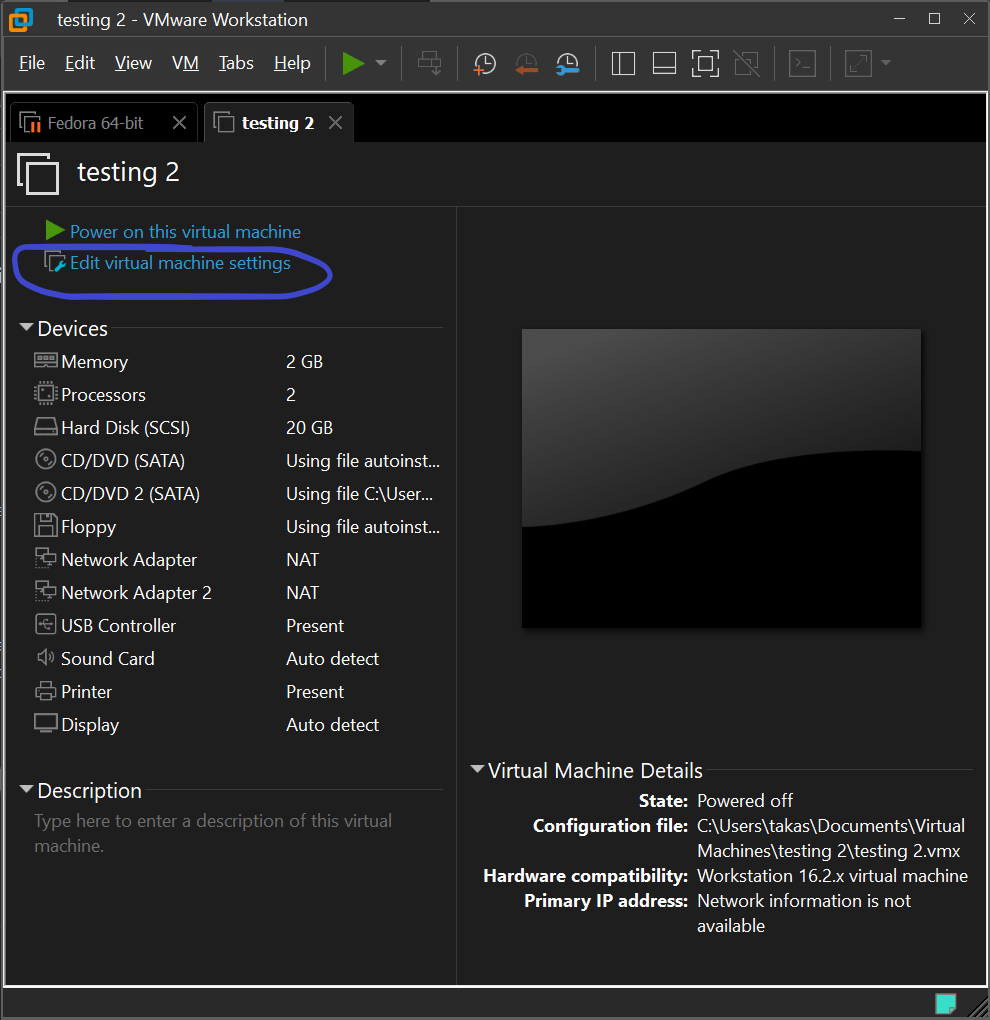
Click on the "Add" button.

Click on the "Network Adapter" option and click "Finish".

Select any one of the network adapters from the left and change the Network Connection to Host Only.

Get your computer's IP address on your Host-Only network.
Before we write anything down, we'll need to double check your network details.
Open your Task Manager and go to the "Performance" section. Find an entry with VMnet1 and click on it.
You'll find the IP for your Host-Only Network Adapter. Note that this is NOT THE GATEWAY IP, it is your computer's IP. Remember that your computer and VM is now in the same network, thus they both have their own unique address.
For any given VMWare software, the default Gateway IP is always
xxx.xxx.xxx.2. If your computer IP is192.168.170.1, then your gateway is192.168.170.2.

Set up static IP in Ubuntu.
When you're in Ubuntu, click on the 3-prong icon on the top right corner to see your network connections. There will be 2 connections, one connected and one connecting (or off). The connecting / off network is your Host-Only adapter.Click it and select "Wired Settings".

On Wired Settings, click on the Cog beside the connecting / off Network.

In the menu, go to the "IPv4" tab and change the method to "Manual". Enter your address, netmask (subnet mask) and gateway.
- The address should be the IP address obtained above, with the last field changed to any number that isn't 0, 1, 2 and less than 256.
- The netmask is
255.255.255.0.- The gateway IP is mentioned above.
After entering the values, press the "Apply" button. If the network does not try to connect immediately, just click the toggle.

If both networks are connected, than you've successfully set up static IP.
Install and set up samba server on Ubuntu.
First, install samba by running sudo apt install samba.

Ubuntu's default samba configuration is suprisingly good and it should work out of the box. However, you do need to add your own home folder to the configuration.
Open the configuration file with sudo nano /etc/samba/smb.conf (or any editor, really. It's up to you)

Go to the very end of the file and add an entry (replace (username) with your Ubuntu username):
[(username)]
  comment = My home folder
  path = /home/(username)
  guest ok = no
  browseable = yes
  writable = yes
  create mask = 0755
  directory mask = 0755
Save and close the file.
After that, you will need to add your username to samba. Run sudo smbpasswd -a (username):

You're ready to go! Start the samba server by running sudo systemctl start --now smbd
Connect to your samba server from Windows.
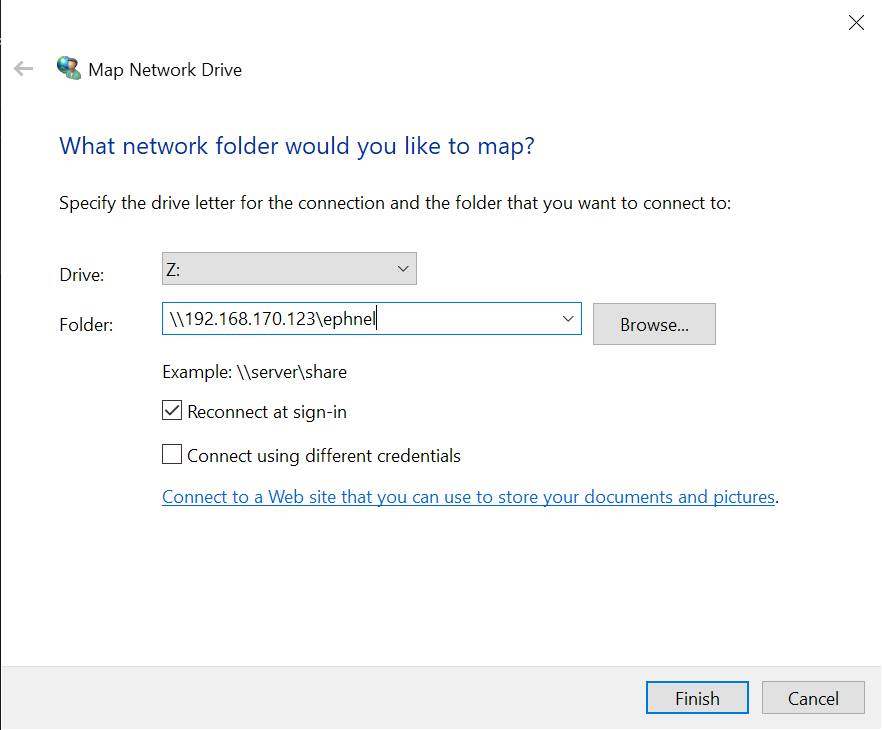
You're almost set! Open File Explorer, go to "This PC" and click "Map Network Drive".

In the dialog, enter \\(your Ubuntu IP Address)\(your Ubuntu username). Click "Finish".
Windows should ask you for your username and password. Enter them, and you're in! If everything is set up properly, you should be able to see your home folder in File Explorer and can add, edit and remove files.
The password is your SMB password, the one you entered into
smbpasswd. It can be different than your Ubuntu password.
With everything set up, your home folder behaves almost like a USB drive attached to your computer. As long as the VM is started, you can access it.
Tired of typing 192.168.170.123 everytime? Here's a tip to turn that IP address of yours into a human-readable, memorable name!
You'll need Administrator privileges.
- Start your editor with administrator privileges.
- Open
C:/Windows/system32/drivers/etc/hosts(Your Windows installation may be different, but you get the idea). - add
(Ubuntu IP address) (any name, eg. ubuntu.local) - Save the file.
- You can now address your VM with the new name instead of the IP address!


