Software testing is an integral part of software development and quality assurance. Testing can help us write better and quality code, spot ambiguities early, catch regression, refactor with confidence and also deploy to production while enjoying a cup of coffee ☕.

We need to have a structured test with test cases that verify different behaviours of our application. Mocha is a JavaScript framework that organizes our test cases and runs them for us. Although Mocha will not verify our tests behaviours, we are going to make use of Nodejs assert library to verify our test behaviours.
NodeJS is a runtime environment built on Chrome’s V8 engine that enables us to write and run JavaScript outside a web browser. Node.js uses an event-driven, non-blocking I/O model that makes it lightweight and efficient, perfect for data-intensive real-time applications that run across distributed devices.
NodeJS modules are blocks of code with specified functionalities that can be used with an external application based on their respective functionalities. The core idea of NodeJS Modules is encapsulation, reusability and modularity. Modules can be classified into three parts such as:
- built-in modules: are modules that are part of NodeJS. They are readily available in our NodeJS installation and we can make use of them in our application by calling the
requirefunction with the name of the module as an argument. For instance:
https://gist.github.com/fb2558c04b247b1399ccf59e4dbbbdc5
- local modules: these are modules that we can create locally in our application and can be reused in our application.
- third-parties modules: these are modules that are provided from external sources other than our local application and NodeJS Core Modules. Mocha is a third-party module that we have to install from external sources.
- NodeJS: which can download here. We can verify if NodeJS is installed in our machine by running this command (
node --version) in our terminal. We should get the installed version in our terminal such as:

- Any suitable code editor of our choice. Although I will be making use of Visual Studio Code which can be downloaded here.
We will write a simple NodeJS application called core_modules.js that makes use of the built-in module path to print the extension type of our program which is .js
https://gist.github.com/89c460ef629551d650ef05a18ff4d6a3
The path.extname functions take a string argument (path) and return the extension of the file in the path. When we run this code by running the command, node core_modules.js, in our terminal. process.argv is an array and the second element (index 1) in it is the path to our running JavaScript file.
Running the code above, we should get the result: .js.
Now we are going to write a NodeJS module that mocks a student managements application. This module would be able to store a list of students, add new students to the list, get the list of students and grade student performance between the range of 0 to 100.
Having the prerequisites above in place, we will create a new folder and initialize our application environment. In our terminal, we will create a new folder by running the command
https://gist.github.com/01328d3e147efecc658eeda427066352
Change our terminal’s current working directory into the students-manager folder by running
https://gist.github.com/b01ee54c837e06b8d44f0edc5f702ee6
Next, we will initialize npm, which is needed because we are going to install Mocha via npm.
https://gist.github.com/0eb0f00dcb52c8e4e700bdf654c65c6b
The -y option allows npm to start our project using the default options:
We will create an index.js file where we can start writing our NodeJS module.
https://gist.github.com/4aa3378cbea7a11720ae991d6638cd59
In the above code, we created a class with a constructor that takes an array of strings (student names) as an argument and converts each array item to an object with an id, name and performance properties. The #students is a private property of the class that can only be accessed internally.
The generateId is a helper function that increments the counter variable by one and returns the current value of the counter. The returned value will be used for generating a unique id for each student created.
The generateId and counter represent a feature of modules which is, encapsulation. Encapsulation helps us hide implementation and expose functionality. A real-world scenario is how vehicles work, many of us do not really know how the engines work and the gear system works, we are exposed to the functionality of the car which is majorly driving.
Let’s create a method, called add(), to add a student to the list of student:
https://gist.github.com/e1bb9c73d7def574d965dc8838f0a566
The add() method takes a string (student name) and creates an object the string as a name property and the student performance set to null
What if we want to add a batch of student names, it would make sense to be able to add in a single name or multiple arguments of name using the same function so we will rewrite the add() method.
https://gist.github.com/dbcdcae9926c4f03df4cb067aa86b62f
Next, we will include a method, called getStudent() that returns an array of the student(s) and their details.
https://gist.github.com/ede309203ced2fcefa650e479ee622f5
The getStudent() method works in two ways depending on if studentIdOrName is passed as a parameter. studentIdOrName can be an id of a student (number) or the name of a student (string).
The method returns just a single student if the id or name of the student is found, else it just returns the whole students list.
We are making use of the filter() which is an array method. The filter() loops through each item in an array and make that item accessible via the callback function we passed to it. If the callback returns true, the filter() includes that item in its result.
Let’s create a method to be able to grade the students, the function would take two arguments, one for student id and the other for the score of the student which should be a number between 0 and 100.
https://gist.github.com/6c3c41af99744f5ff4d9bf3fbf1a3f0b
Our score() method checks if the performance is between the range of 0 - 100 if the argument is lesser than 0 or greater than 100, we will raise an Error. The method checks through the list of students and finds the student with a similar id provided in the method's first argument.
Up until now, the index.js file is not a module yet so we need to export it to make it reusable across our local application and test it.
https://gist.github.com/3299554b37374420c0c56c07b2977f99
NodeJS uses the CommonJS convention for modules, hence we now have our module exported and ready to be used across our local application.
Once done, our index.js should be similar to this:
https://gist.github.com/7fb6fd44b29f2d2fdd92b434dc22f75e
Next, we will manually make use of our project and see how it works.
We create a demo.js file in the root directory of our students-manager folder and make use of the module by calling the require function.
https://gist.github.com/22c28fe2a527fcfc93781d95bb76837b
When we run this application by calling node demo.js we can see the result verify that the module works as expected.
Here’s a screenshot of the result :

Remember when we spoke about the NodeJS module, we spoke about the different types of modules, assert is a built-in module while mocha is an external module so we have to install it into our project using npm.
In our terminal, ensuring that we are still in the students-manager directory, we will install mocha by running the command:
https://gist.github.com/d6b258c7d4568937dc025a925a985f88
The --save-dev flag saves mocha as a development dependency in our NodeJS because we only want to write tests in the developments stages and not include them in production deployments.
Let us create our test file, called index.test.js and include our local StudentManager module and also the asset module in the current working directory:
https://gist.github.com/5bbd74250df0d34a58d47a186543ee12
Mocha helps us organize and run our tests. The test structure is usually structured as below
https://gist.github.com/2a105cc9ad9b31e06c776eed42d6fbcf
The it function contains our test code. This is where we make use of our assert module to test our StudentManagement module.
The describe function is not necessary for Mocha to run our test but it helps group our tests and easily manage them.
Let’s define our test cases and write the implementation of these tests cases.
- initialize our module with three names: Abel, Ben and Cain
- confirm that the module has a total of three students
- add two new students and confirm that number of students increased to five
- score Abel with 50 and confirm that the score is included in Abel performance metric
- score Ben with 120 and confirm that the module throws an error
- We will create our test file in the root directory of our folder:
index.test.js
https://gist.github.com/1eee86671a63216847ce0c415d17e9ad
-
Import both the custom module we created and the
assertmodule for verifying the test behaviourconst assert = require("assert"); const StudentManagement = require("./index");
-
describe(): this function as we mentioned earlier is used for grouping our tests and adding a description to the test. Since we added our test to this block, thebefore()method is a hook that runs before the first test is started. AtestClassis defined in this block to make it globally available to all our tests. -
In the
beforefunction, a new instance of theStudentManagementis created with three students and passed to thetestClassvariablebefore(() => { testClass = new StudentManagement(["Abel", "Ben", "Cain"]); });
-
assert.equal()checks if two variables are equal, it uses the==operator. This type of equality checks tries to covert the variables of different types to the same times unlikeassert.strictEqual(). Theassert.strictEqual()makes use of the===operator. -
assert.deepEqual()is used to check for the equality of the objects, which does a comparison of the enumerable properties of an object -
To assert if an error occurred in an application, the
assert.throws()methods would only pass if an error is thrown it the callback passed to it.assert.throws(() => { testClass.score(1, 105); }, Error)
The second argument,
Erroris a constructor for creating errors. For instance:const OutOfBoundError = new Error("The index is out of bounds")
The
assert.throws()verifies if the type of error thrown in the callback is of the same type with the Error object passed in the second argument.
To run our test, we are going to make use of Mocha by running the below command in our terminal in the root of our current working directory which is students-manager:
https://gist.github.com/e2e02c45258f2eef897331d79efd073d
But npm has a feature where we can define different sets of commands and make them simple and shared. The commands are found in the scripts section of our package.json file.
When we ran npm init -y, npm creates a package.json file for us and when we installed Mocha, npm updated this file for use with the installed dependencies.
Let’s create our script called:
https://gist.github.com/a43b88004e69e1a823c45d94b02a8df1
Then our final package.json should be similar to this:
https://gist.github.com/46bf28e5fde729d5d62f59d1de8c99e9
Now, let’s start our test by running in our terminal:
https://gist.github.com/8f5e3239ca26305ed1ee6f74740b02e5
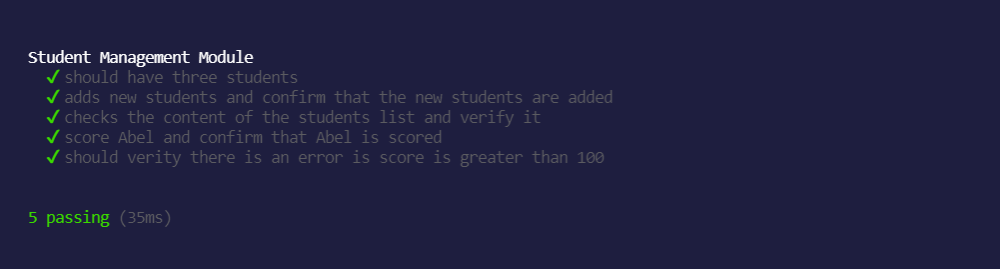
The output of our test in the terminal:
In this tutorial, we got introduced to NodeJS modules, how to require modules in our application and how to create our module. We created a NodeJS that mocks a student management application and wrote tests based on the functionalities exposed by the module with Mocha and assert for verifying our test and enjoyed a cup of coffee doing this

Mocha is a feature-rich JavaScript test framework running on NodeJS and in the browser, making asynchronous testing simple and fun. Mocha tests run serially, allowing for flexible and accurate reporting while mapping uncaught exceptions to the correct test cases.
Challenge yourself by writing tests for your subsequent NodeJS modules.
To deep dive into Mocha, you can check out the official Mocha documentation. And to continue learning about the NodeJS module, you can check the NodeJS documentation on modules
If you enjoy reading this article, you can consider buying me a coffee